Introduction
ZooExtension.com always explores many Shopify Themes and gives you many surprise designs. And Shopify Theme Organic will be the best example. With unique design, impressive color and hamonious texture, Shopify Theme Organic is the perfect choice for any eCommerce website owners who always try to find out solutions that can boost up their sale and increase business growth.
Help & Support
First of all if you are all new to Shopify, I would recommend to learn a little bit about it before you get started. Here are some nice Resources on how to get started with Shopify:
- Shopify FAQ: https://help.shopify.com/manual/intro-to-shopify
- Using Themes: https://help.shopify.com/manual/using-themes
- Products: https://help.shopify.com/manual/products
- Download: Shopify Organic
- Live Demo: https://cleversoft-Organic.myshopify.com/
- Online Documentation: http://doc.zooextension.com/shopify/Organic/
- Help Desk: http://support.zooextension.com
- Include as many information as possible to explain your issue.
- Your URL.
- Name of the Theme.
- Your Shopify version.
- If you installed extensions, specify which are these.
What do you get?
Once you have made the purchase you will find our product in your ThemeForest Downloads page. Click on Download and you will a dropdown will popup with following options :
- All Files & Documentation
- License Certificate & Purchase Code (PDF)
- License Certificate & Purchase Code (text)
We recommend to download all files & documentation (the package) however you can simply download installable Shopify file only if you just want the Shopify Theme file.
The Folder Structure
Once you download the package, unzip it and you will find it contains the following folders.
- readme.txt
- documentation – This folder contains the documentation for the theme.
- themes-files - This folder contains the installable theme files.
- products_export.csv sample data
- themes-base-myshopify-Organic-01-verx.y.z.zip Installable Shopify Theme.
In this document, we will find follow the steps below instructions for installing and using this template effectively. Thank you so much for paying much attention to this tutorial. We would like to help you if you have any question relating to this
General
Layout
This theme has a Responsive layout with one column. The general template structure is the same throughout the template.
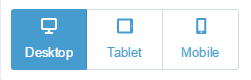
This theme has 3 different layout modes - normal (for 960px or wider screens), tablet ( for screens smaller than 960px ) and mobile (for screens smaller than 768px). Adjust your browser window size to explore them closer.
Organic uses HTML5, so it will NOT support legacy browsers such as Internet Explorer 6 & 7. Theme is usable with IE8, but not to full extent.
CSS Files
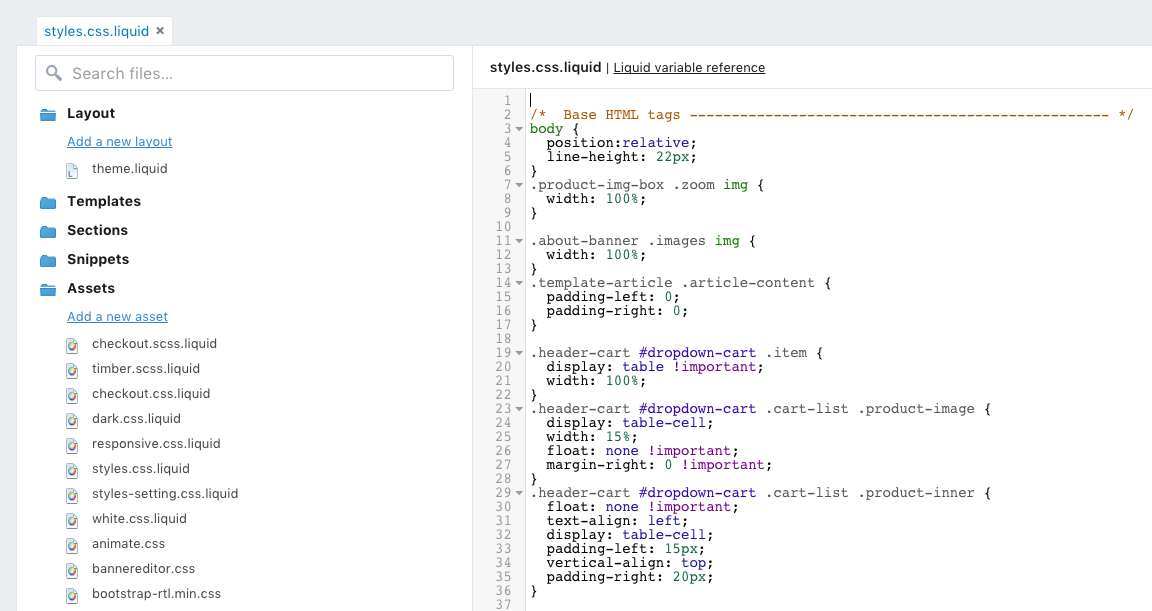
This theme has the CSS files styles.css.liquid
If you would like to edit a specific section of the site, simply find the appropriate label in the CSS file, and then scroll down until you find the appropriate style that needs to be edited. Please follow these steps:
- Navigate Online Store -> Themes-> Edit HTML/CSS
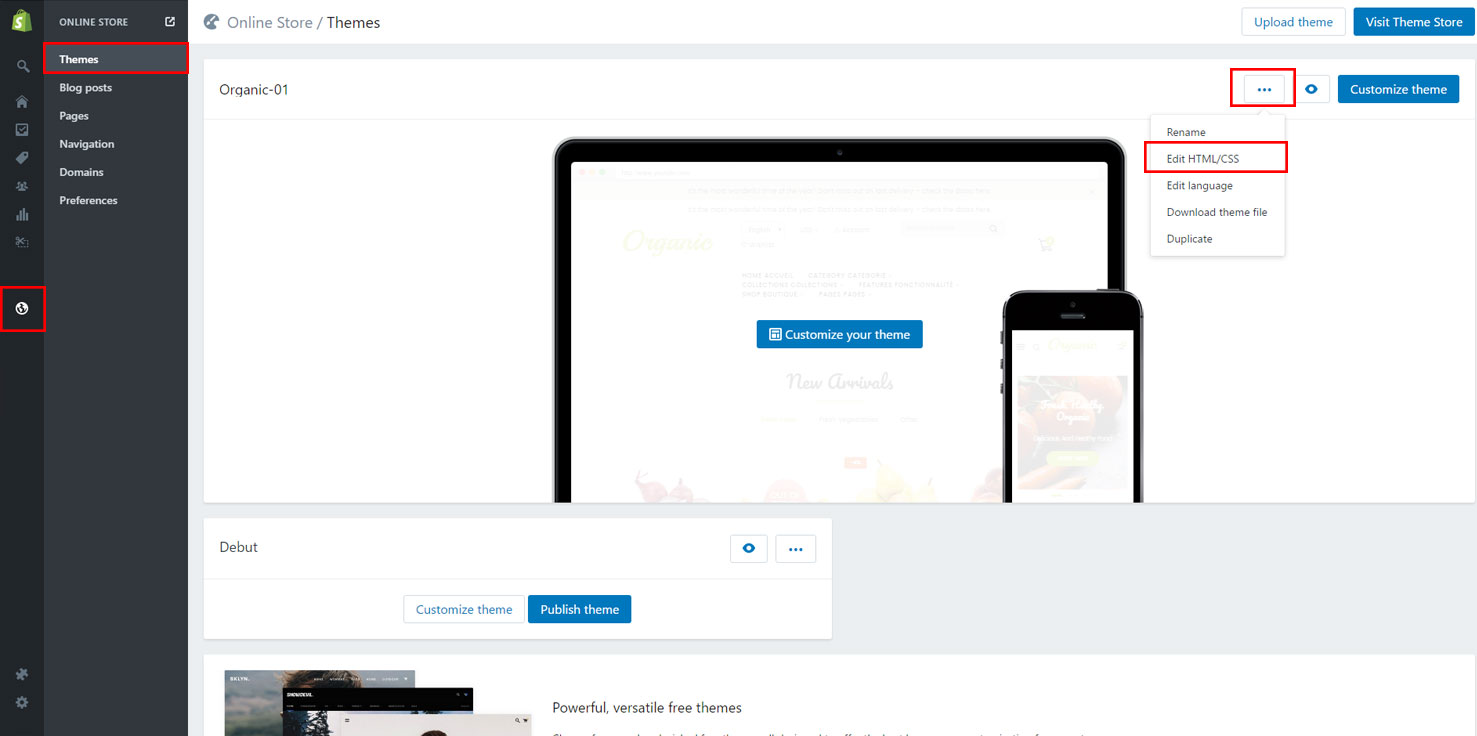
- Find Assets and choose the filestyles.css.liquidthen edit the content as it needs to be
JavaScript
This theme uses Jquery Javascript library and many plugins and custom built scripts. All the theme specific behaviour is written in global.js and this is the only file you may ever need to edit.
It is comparatively easy to find what you need to edit in gosh-scrip.js. Just open the file and look for init function. It initializes all other functions which you can recognize by the name.
Installation
Theme Installation
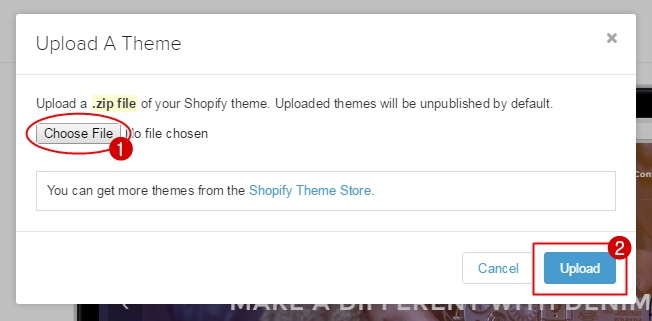
- Open your Shopify admin panel and go to Online Store -> Themes-> Upload a theme in the top menu.

- Select the zip file containing your new theme and click Upload
- After installing theme successfully, choose Publish theme then continue to do other settings

Apps Installation
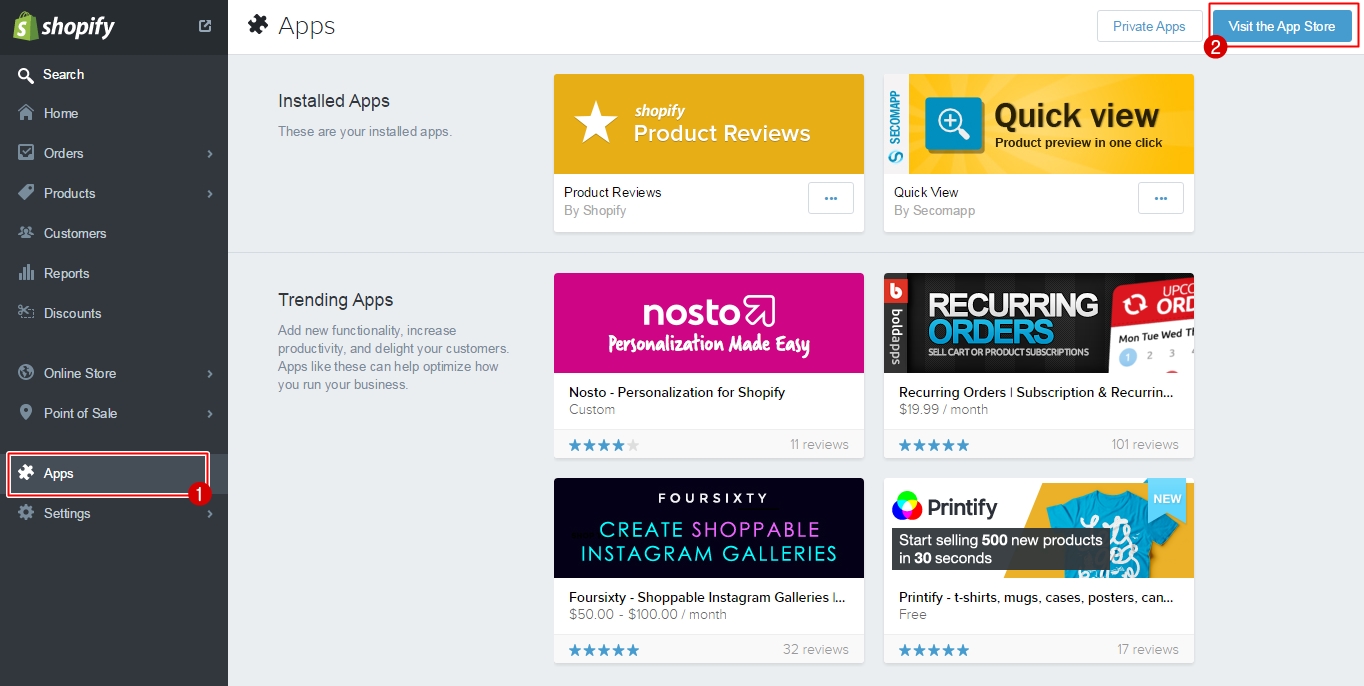
- Choose Apps on the leftside menu then click on Visit the App Store button
Installing Products Review
- Search Products Review app in the search bar then choose Get
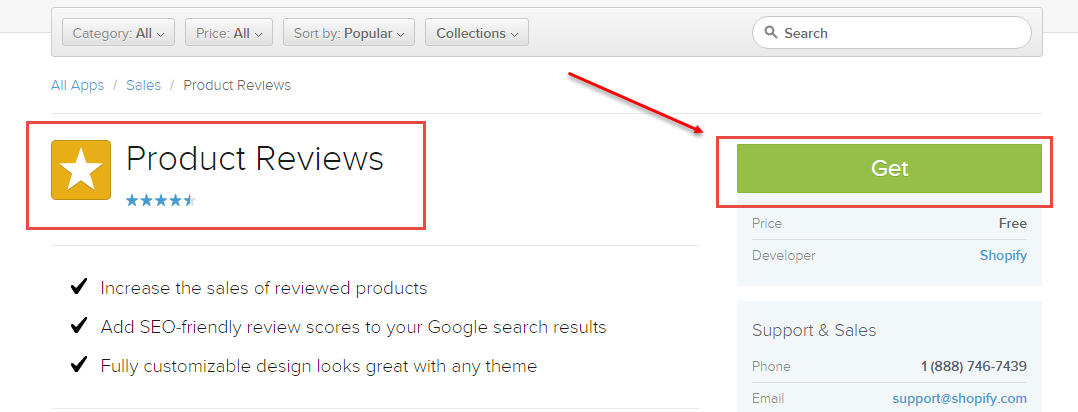
- Choose Install to complete the app installation
Updating theme
When a designer updates a theme in the Shopify Theme Store with bug fixes and added features, those changes are not automatically added to your own theme. There is no automatic or manual way to run updates on your installed themes.
- Download the up-to-date (latest) version from https://themeforest.net/downloads.
- Install the latest version as an unpublished theme.
- Click Go to your Theme Manager. On your Themes page, you can customize the theme while it remains unpublished.
To customize your new theme to look like the older version, you will need to:
Use the theme settings to upload your store's logo, choose slideshow images, and tweak colors, etc.
Replicate any changes you made to the Liquid templates of the older theme.
Uninstall any apps that add code to a theme and re-install them from the Shopify App Store.
- Preview the changes that you have made to any theme by clicking the eye icon:
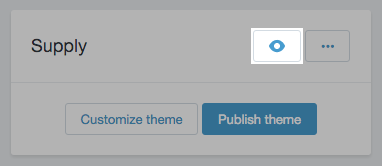
- When your customized theme is ready, publish it by clicking Publish theme:

The old theme will be saved as an unpublished theme. In case you have forgotten to do a few things to your updated theme, you can keep the older one as a reference.
Is there any way to avoid recustomizing my theme from scratch?
From the Edit HTML/CSS page, under Config, copy the content of the
settings_data.jsonfile from the current theme to the new theme.That file contains all the current values of your theme's Customize theme page settings.
Download both themes, copy your images from the old theme's
Assetsfolder to the new theme'sAssetsfolder, and import the themes. Read more about exporting and importing themes.Uninstall and re-install all of your Shopify applications that add code to the theme.
Why are there no automatic updates of themes in Shopify?
This is because themes are often customized by merchants, and automatic updates would overwrite those customizations. Software and apps can be routinely updated, but themes are designed to be customizable by you to suit your needs and reflect your brand. If we ran automatic updates on themes, you would lose all of your customizations.
Import Products
After installing Organic successfully, you are able to import available products:
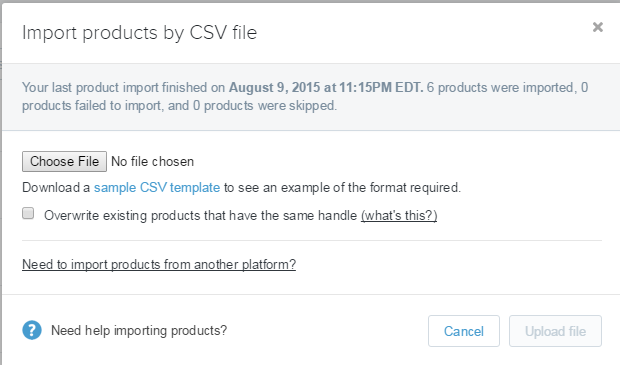
- Go to Products -> Products and choose Import
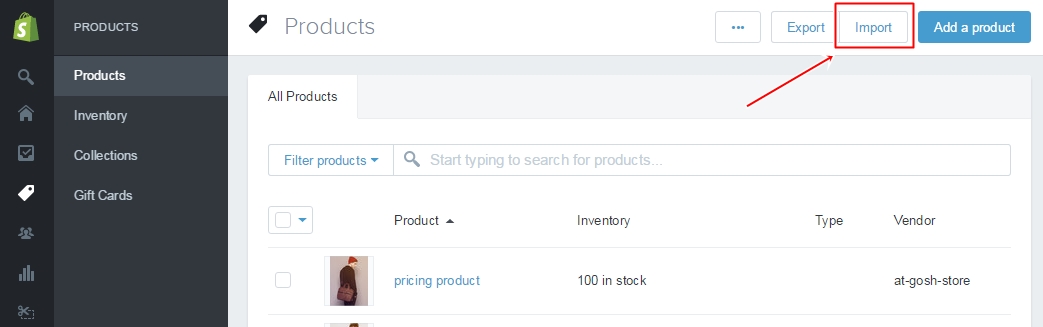
- Import the CSV file you have in the package:
Theme Section
For themes with sections, Shopify's theme editor offers an easier way to customize your store's home page content. You can add, reorder, and remove content on your store's homepage using sections. Sections let you customize your store's design and content in a quick and visual way.
The theme editor has been updated to support themes with sections. If you are using a theme that does not have sections, then you can still have access to the new theme editor.
Introducing sections
Sections are customizable parts of your theme. They let you add, reorder, and remove chunks of content on your store's home page. Each theme has a unique set of sections to choose from. Sections let you pick the types and order of content you want to feature on your home page. Examples of sections include featured products, slideshows, collection listings, or videos.
Within a section, you can add different types of content. These content types make up the content inside each section of your home page. Each section in a theme has its own content types that you can add. Some examples of content types within sections are products, text, or images.
When you add content like images and videos to your store, you can use that content in your theme sections.
Fixed sections
Most themes that use sections will have fixed sections that can't be moved, usually the theme's header and footer. Although you can't move fixed sections around, you can still customize their content the way you want.
New theme editor
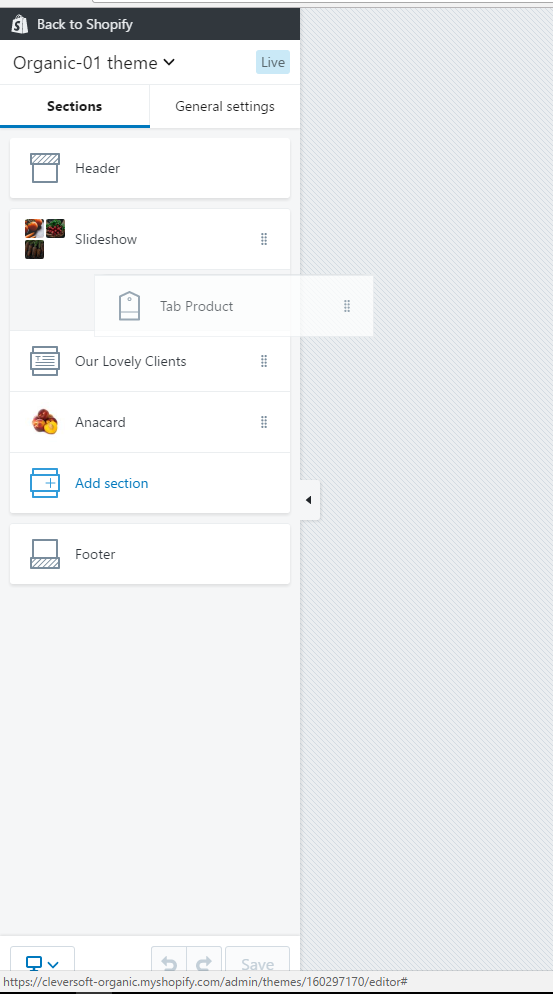
The theme editor has changed to allow you to add and reorder sections in your theme. The new theme editor displays to the left of the screen:
Sections and Settings tabs
The theme editor is divided into two tabs: Sections and General Settings:
- The Sections tab shows the sections that are available with your theme. You can use the Sections tab to add content and move content:
- The General Settings tab lets you make global changes to the look of your store, including typography, text and background color, and links to your social media accounts:
Theme styles
Presets have been renamed to theme styles in the new theme editor. To change your theme style, click the Change theme style button, which is available on the General Settings tab:
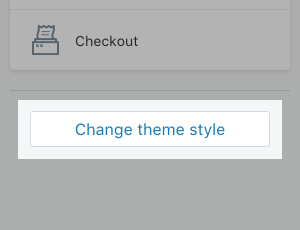
You can use the Change theme style button to reset your theme settings to a default state.
Add content
You can add sections to your home page using the theme editor's sidebar menu:
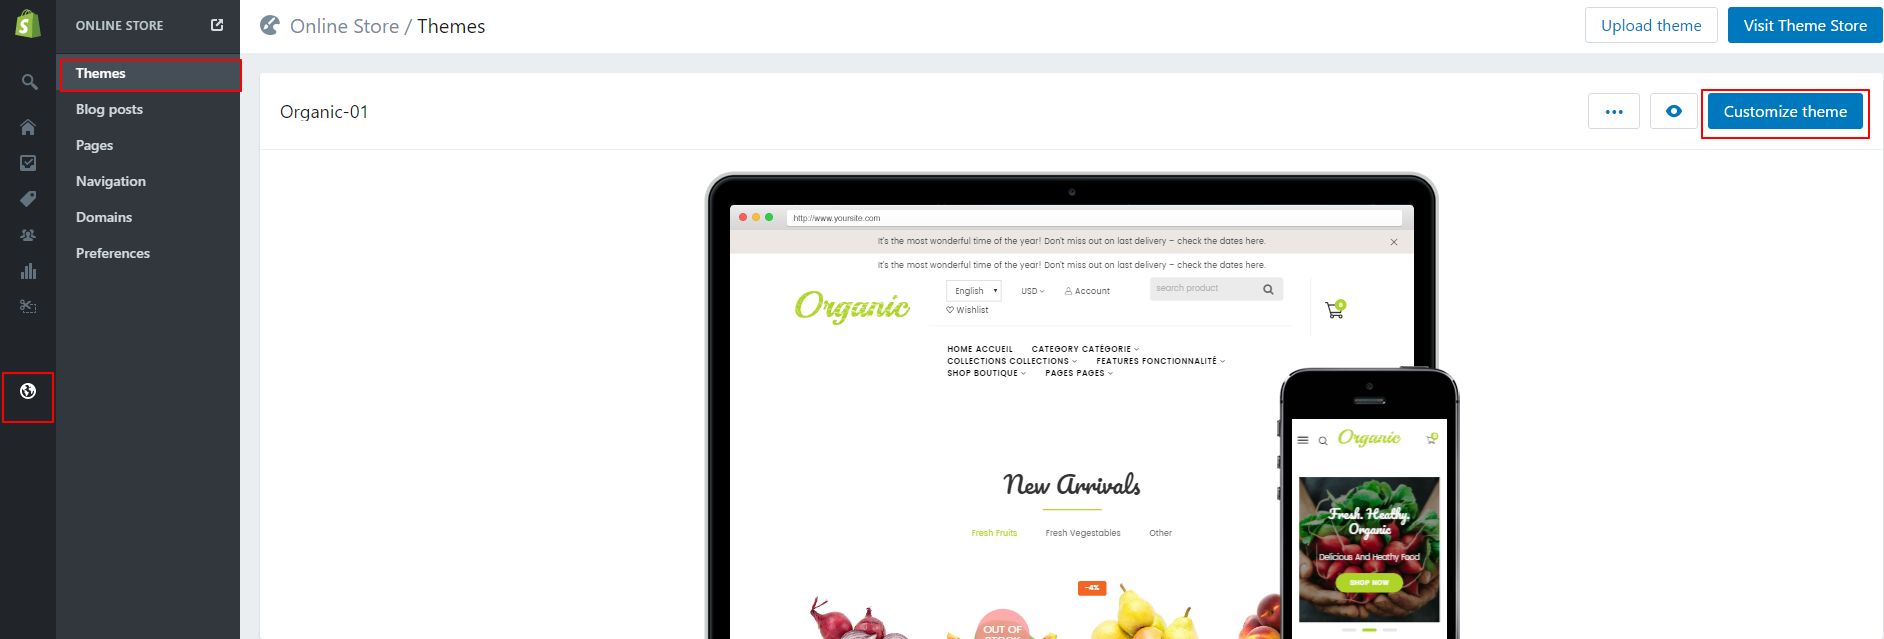
From your Shopify admin, click Online Store, and then click Themes (or press
GWT).Find the theme you want to edit and click the Customize theme button for the theme.
In the sidebar menu, click Add section:
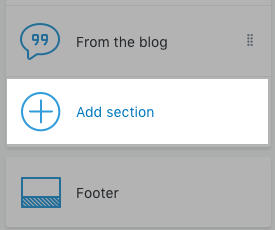
Click the type of section that you want to add, then click Add. The options are theme-specific, so different themes will have different section options.
Change the section's content by adding and editing the content blocks using the sidebar menu.
When you like the way the section looks, click Save or Publish to save your changes to the theme.
Did you know?
When you add an image file to a section, the file is added to your store's files in the files section of your admin. You can then reuse this image in other sections or pages of your store.
Move content
You can change the order of the sections on your theme home page. In the theme editor's sidebar menu, click ⁞⁞ on the section you want to move and drag the section to where you want to move it:
The preview of your theme will update to show the section in its new location.
Remove content
You can remove sections and content that you've added to your home page:
Remove a section
From your Shopify admin, click Online Store, and then click Themes (or press
GWT).Find the theme you want to edit and click the Customize theme button for the theme.
In the sidebar menu, click the section that you want to remove.
Click Delete section at the bottom of the sidebar menu.
Remove content from a section
From your Shopify admin, click Online Store, and then click Themes (or press
GWT).Find the theme you want to edit and click the Customize theme button for the theme.
Click the section containing the content that you want to remove.
In the Content section, click the content you want to remove from the section.
Click Delete [content], where [content] is the content type (collection, image, or logo, for example).
Did you know?
Deleting content in this way just removes the home page content — it doesn't delete things from your store. If you delete a product or collection block from a section, that product or collection will still exist in your Shopify store. If you delete an image in a section, you can still add that image to other content blocks.
Theme Settings
The unlimited number of layouts gives you the possibility to create an unlimited amount of different looking pages on the same website.
Open your Shopify admin panel and go to Themes-> Customize theme in the top menu. There you will find all the settings available for this theme. After each step, do not forget to Save Changes
Header & Logo
Header Layout
Organic includes different Header Layouts to better fit the needs of your website(s). To change the header layout, edit the header layout setting.
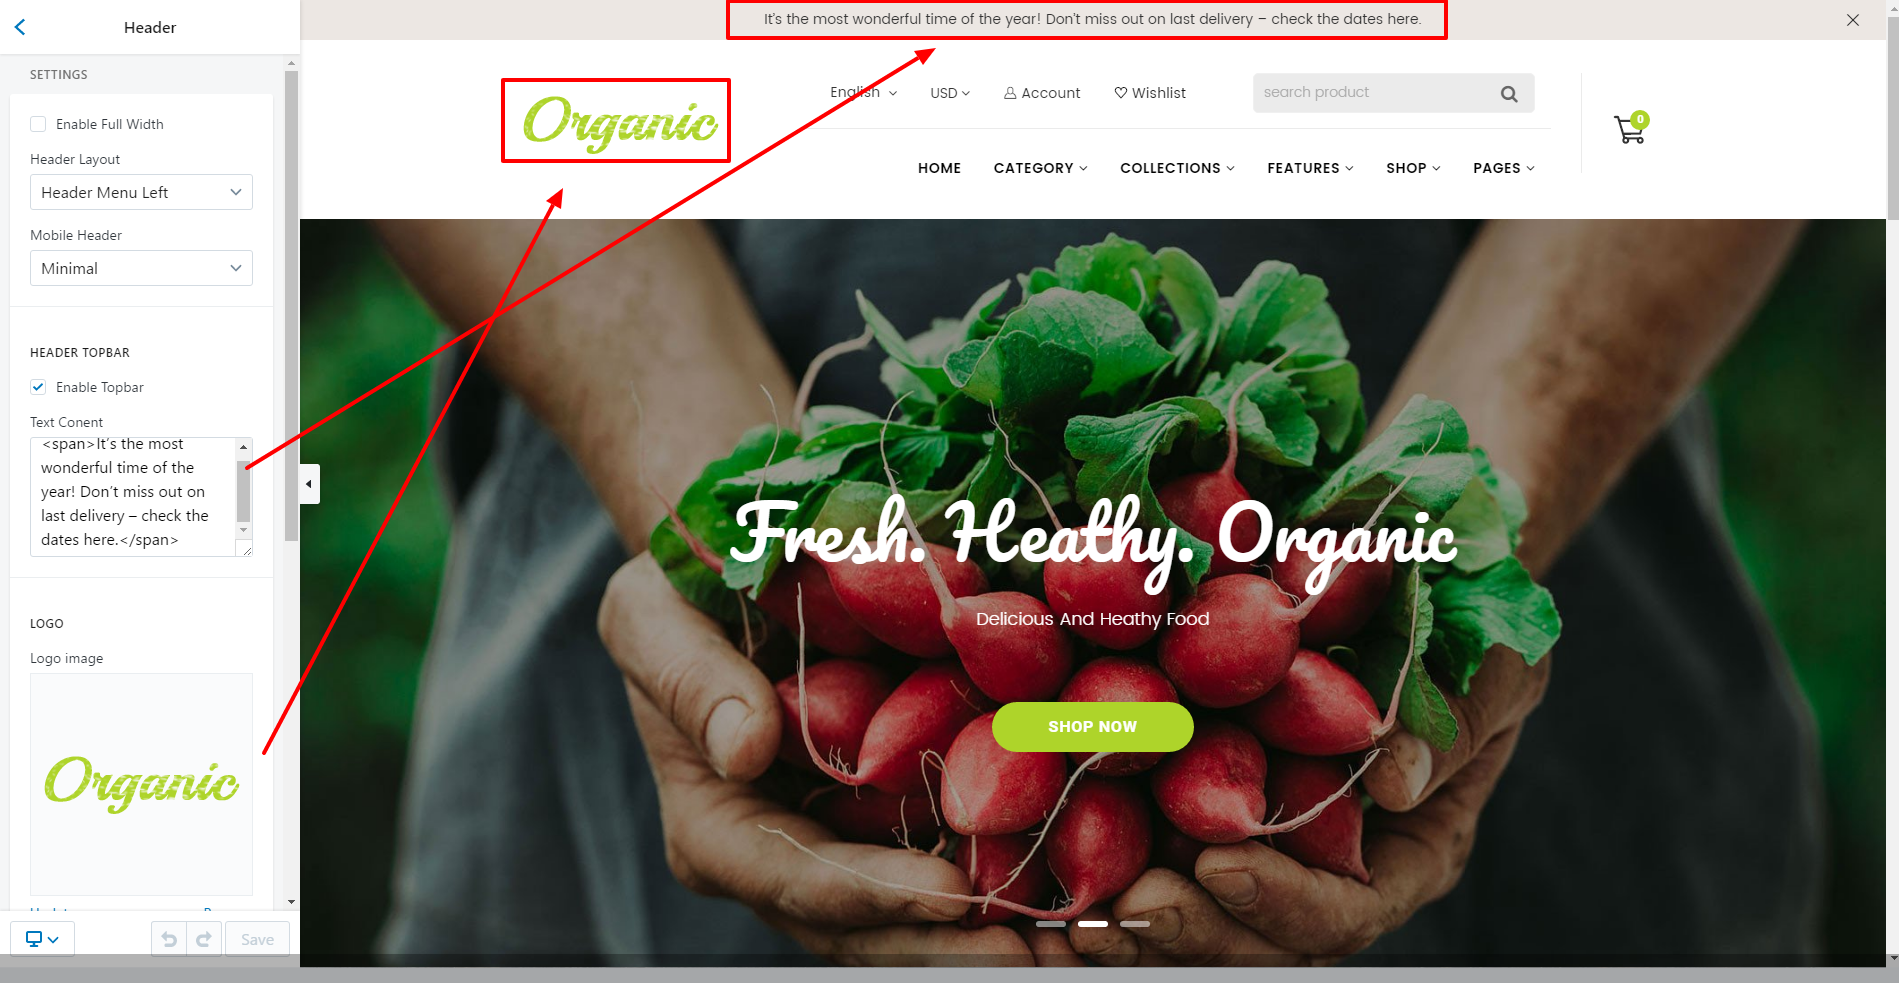
Uploading your logo
Go to theme settings and open tab Header and Logo. There you will find a select box that allows to choose between using a textual logo and a picture. You can also choose Header Layout style here. If you select the picture, you can upload it using the upload form right below. Don't forget to also write your shop's tagline.
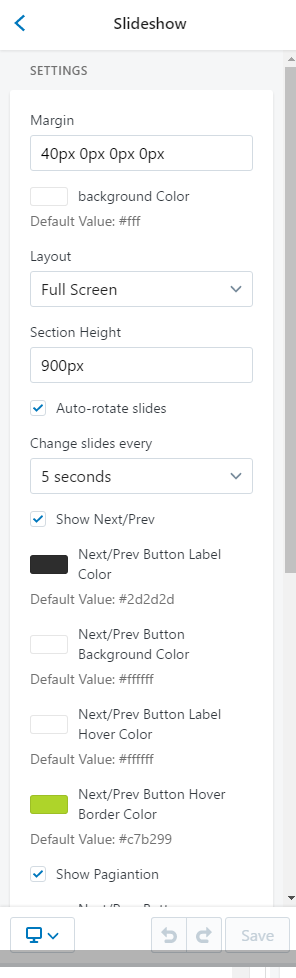
Slideshow
You can setup homepage slideshow in Customize Theme page under the Sections tab. You can have at max 4 slides, whom you can enable one by one using checkboxes given.

- Choose the box next to Enable Slide and Full Width
- Everything you can do more is only uploading the photo, entering the text for each image and choose transition Effects to display the image. Then fill in all information as following image.
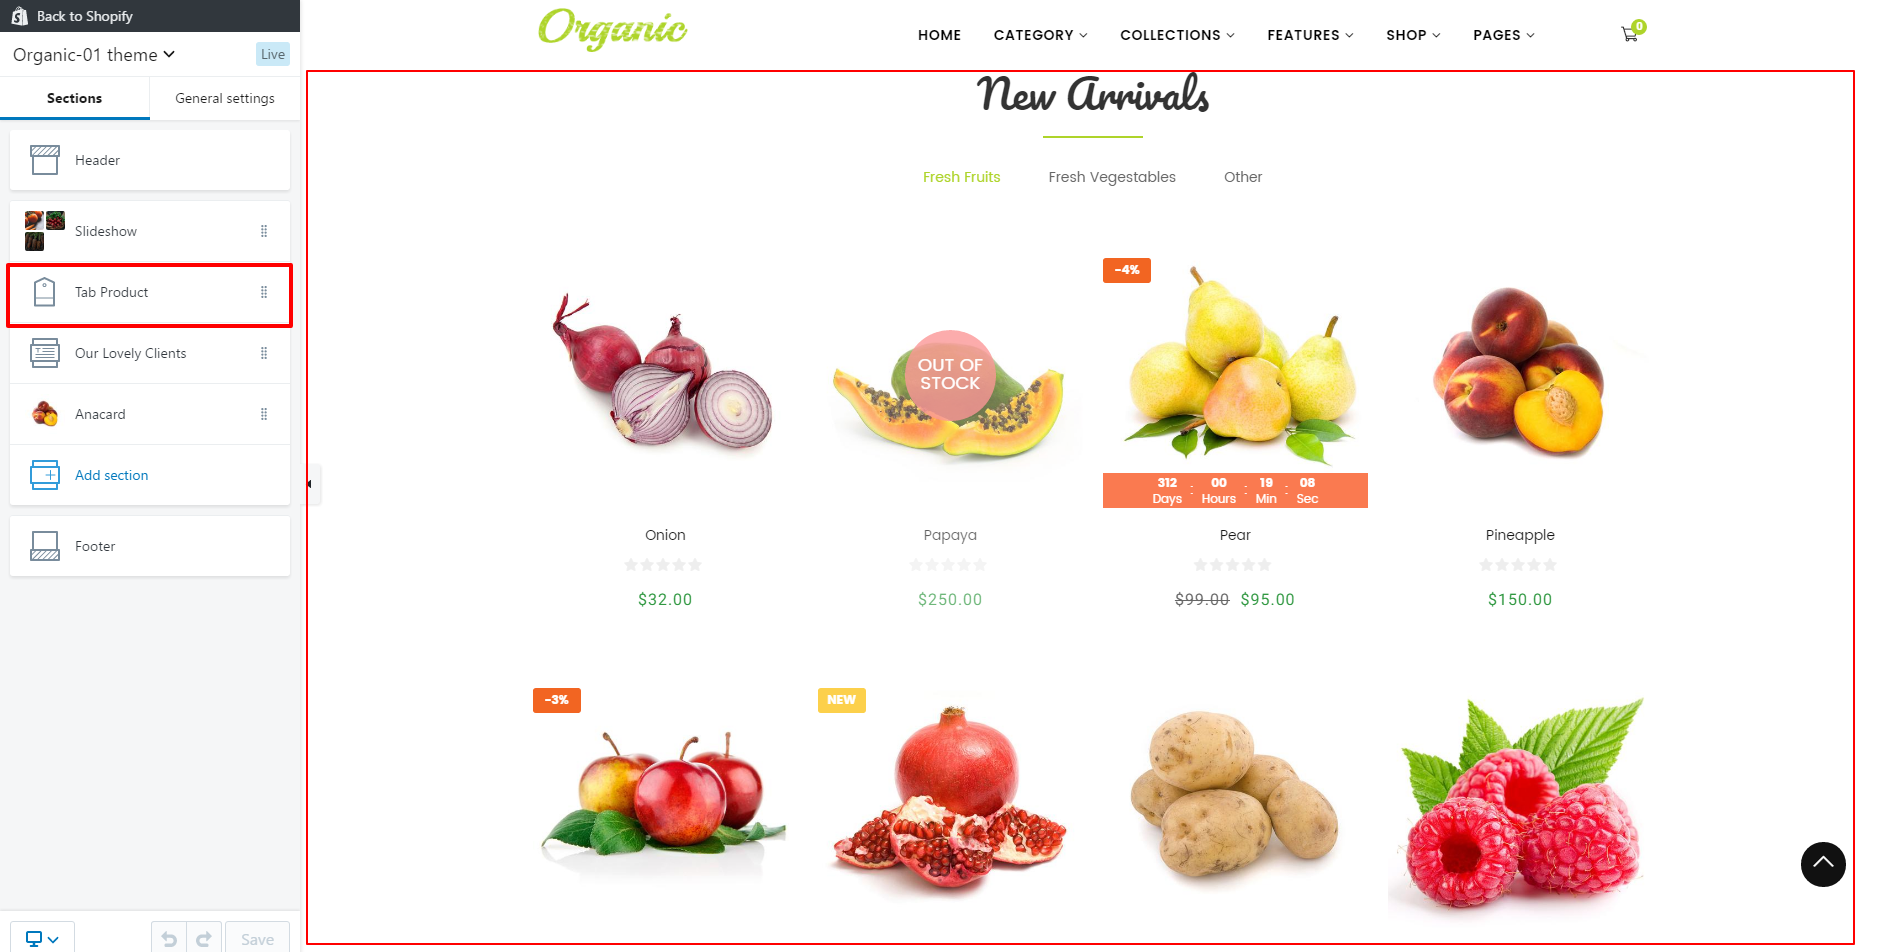
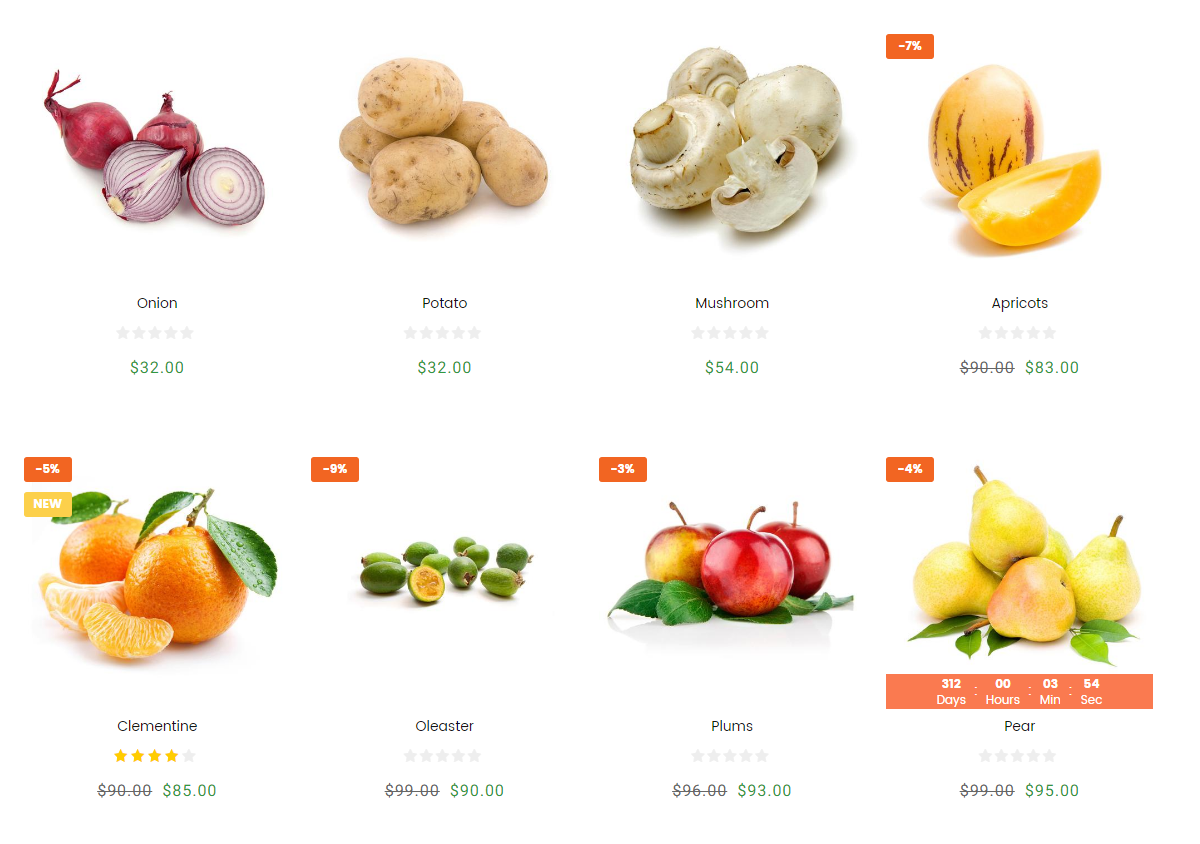
Homepage Sections
Home Deal Product
You can setup Home Deal Product in Customize Theme page under the Sections tab.
Home Testimonials
You can setup Home Testimonials in Customize Theme page under the Sections Testimonials.

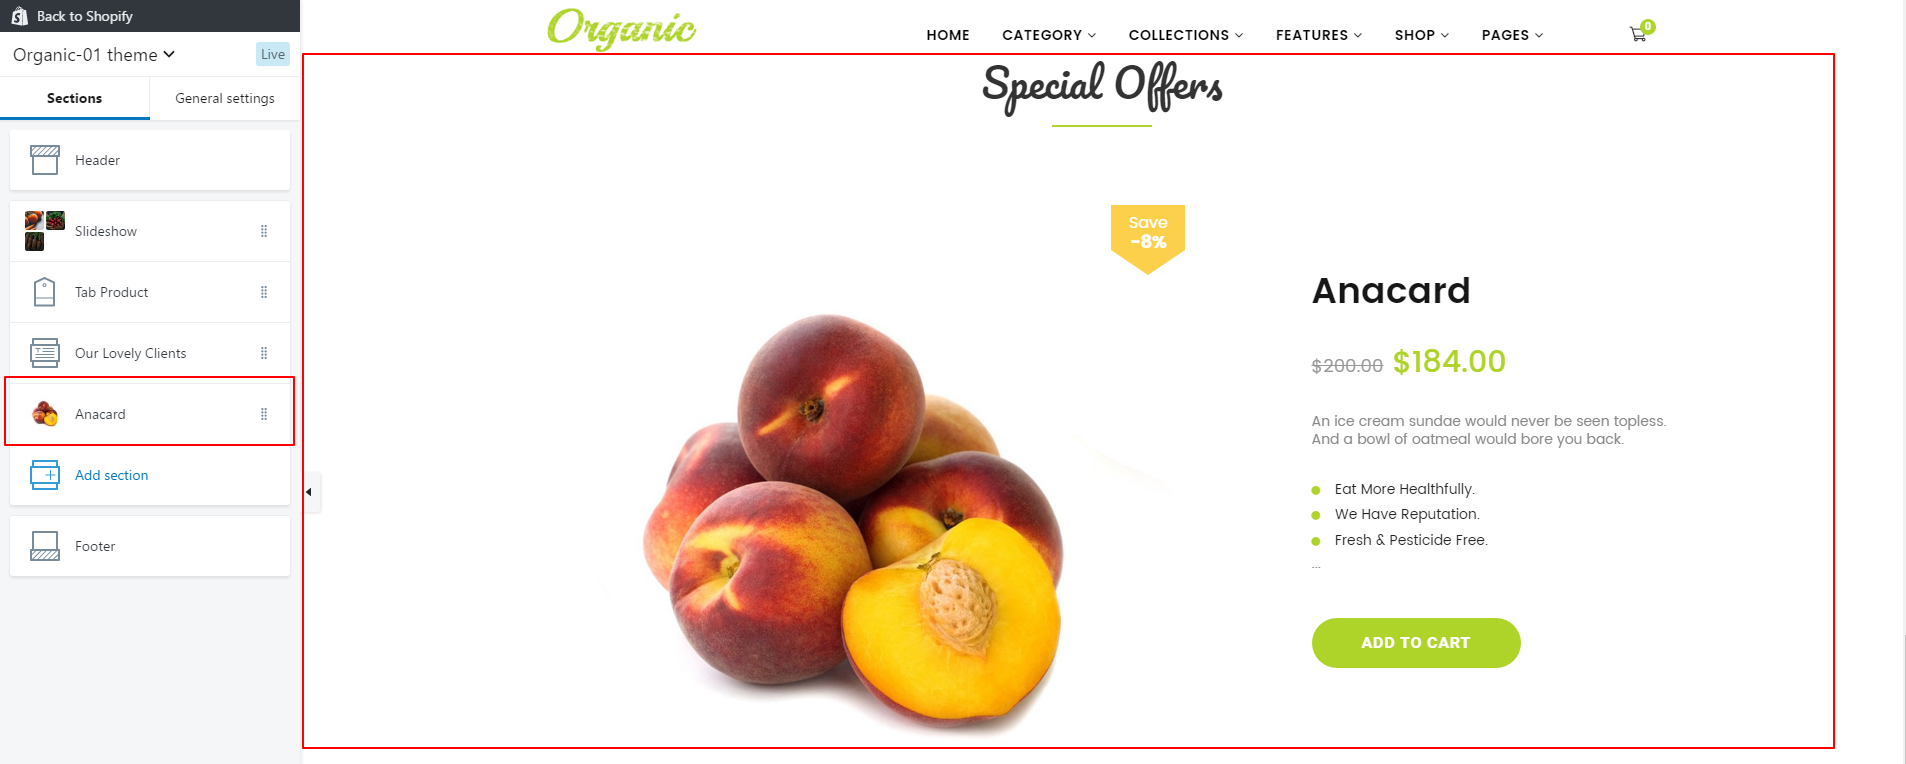
Single Product
You can setup Single Product in Customize Theme page under the Sections Product Item.
Instagram has become one of the most important marketing channel these days so its important to leverage the benefits of your Instagram traffic by showing real authentic photos on your Shopify store.
Step 1: Go to Online Store -> Themes -> Customize Theme -> Home Instagram
Step 2: Check the Enable

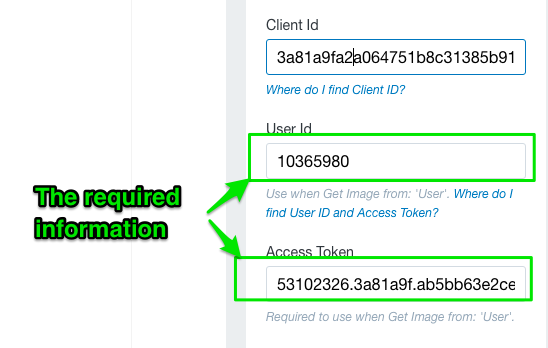
Step 3: Insert your CLIENT ID, User ID, Access Token
- Client ID
- User ID
- Access Token
Get a Instagram Client_ID key
To be able to use Instagram Feed, you need a client ID. This simple guide will follow the steps below tell you have to get one.
* Note: You need to have a Instagram account to be able to get a client ID *
Follow these simple steps to get your own key.
- Login if your not already.
- Go to the Instagram Developer page.
- Click on ”Register your application”.
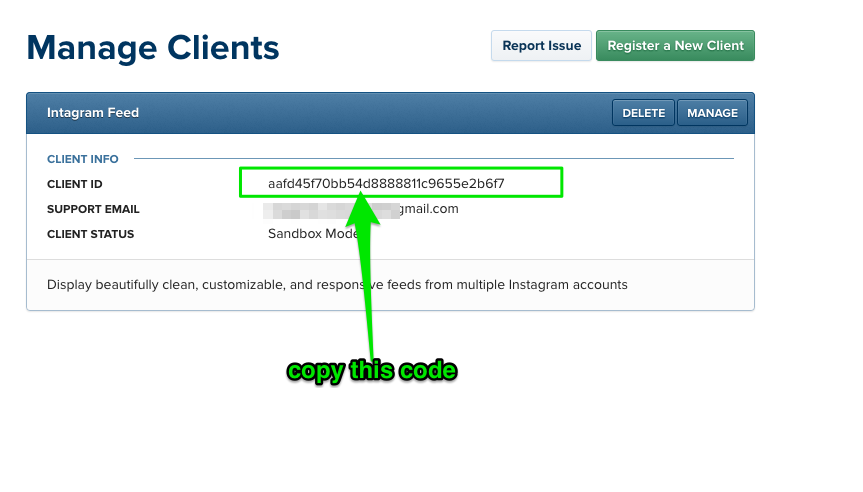
- If you don’t already have a application registered, you will now see a form to register a new one. If you instead see a list of "clients", click the Register a New Client at the top right.
- Set application name to your websites name
- Type in a description, something like "Registering to get a client ID to use in the Instagram Feed"
- Add the url of you site on the two last fields.
- Hit register.
- Click "Manage clients" in the top menu and you will now see you new client in the list and a client id, client secret and more. Copy the client_id and past that in the right field in the Home Instagram settings tab.
How to get Access Token & User ID
It’s really easy to generate your own Instagram token in a safe and secure manner. Just follow the steps below:
Copy the URL in the grey box below and replace the bits in UPPERCASE with the information you noted earlier on (Client ID and Redirect URL):
https://api.instagram.com/oauth/authorize/?client_id=CLIENT-ID&redirect_uri=HTTP://YOURREDIRECTURLHERE&response_type=token
Hit enter, and you will connect to Instagram's servers. Instagram will ask you whether you want to grant the client you registered in Step 2 access to your account.Once your client has been granted access to your account, Instagram will redirect your browser to your localhost and your newly generated access token will be appended to the url after
Note: What happen if you can't Register an Application, don't worries just forget the CLIENT ID then Log in and get your Access Token and User ID.
You can also find your User ID by using your Instagram Username with this tool.
Copy and paste this info into the Access Token and User ID fields in the Instagram Feed setting tab.
Newsletter

We are using MailChimp to configure our newsletter form, but there are a lot of services and plugins you can use. Follow these steps:
- Go to http://mailchimp.com
- Register and account if you do not already have one, and log in.
- Go to section "lists" and click on "create list"
- Fill in all nedded fields and click on Save at the bottom of the page.
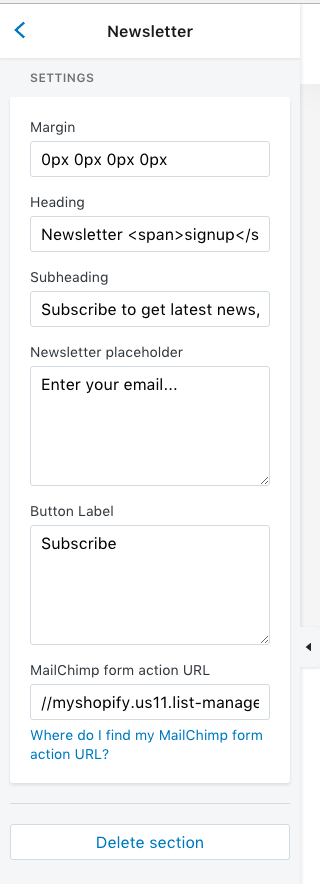
Now go to Themes-> Customize theme -> Newsletter area. Follow these steps:
check on the box to Show Newsletter
Enter Newsletter title and Newsletter Smaill
Enter MailChimp form action URL. For more information, you can read Get a MailChimp form action URL
Product Collection
After you created a Collections as the chapter Add a collection above, you can manage layout to one of your existing collections.
In this template, we use 4 layout collections types called Template suffix. You can use this funtions to make one particular collection have a different look/layout than the other collections on your Shopify Shop.
- From your shopify admin go to Products -> Collections > Click the name of the collection you want to change template suffix then chooose one of Template suffix for this collections. The image below shows an example of the setup for a Template suffix:
Choose Template suffix:
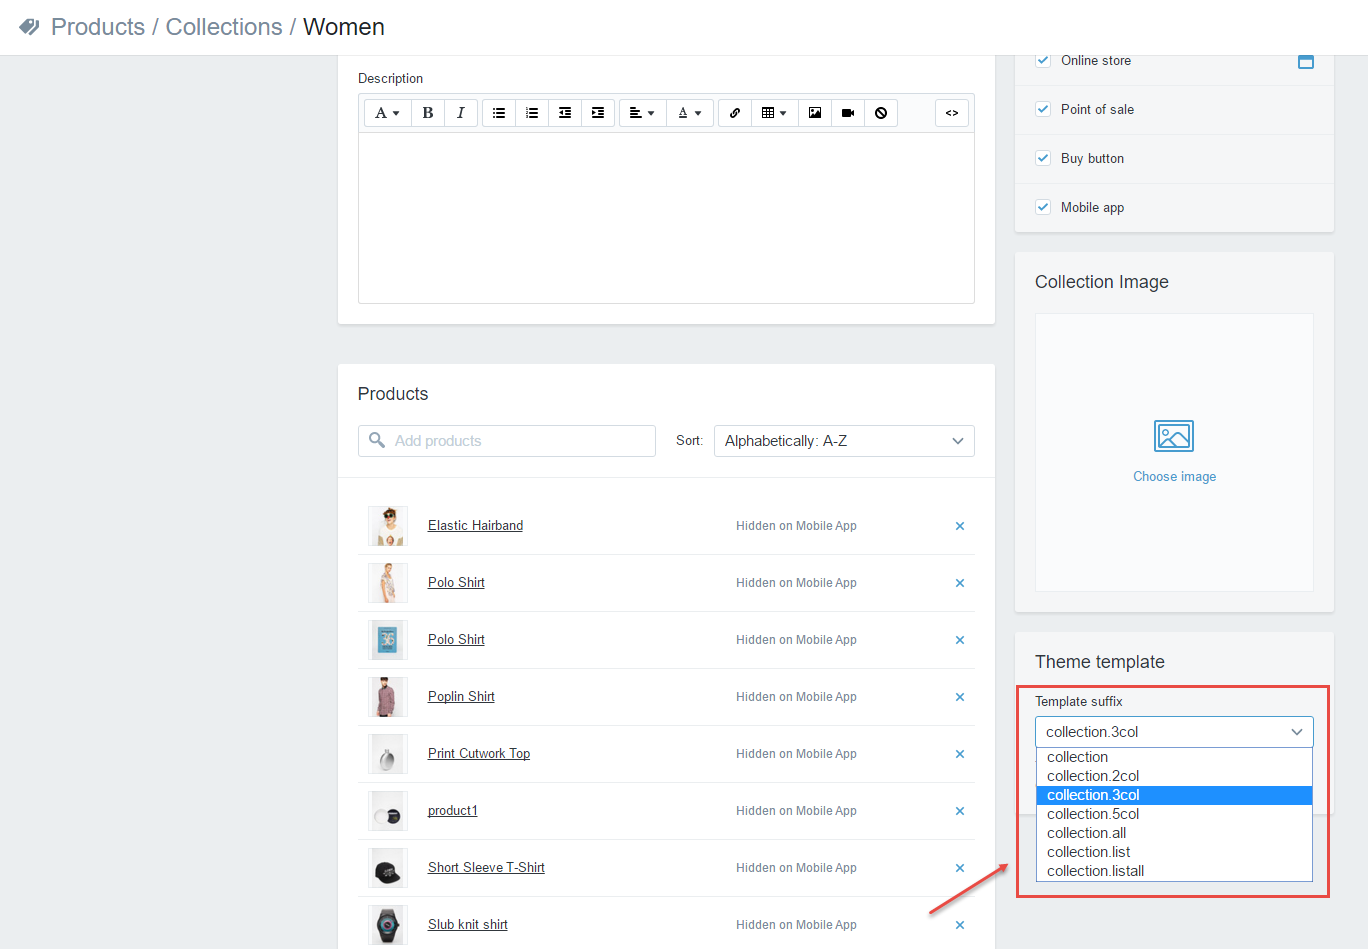
- Choose the template that should be display this custom collections in your shop.
Output:
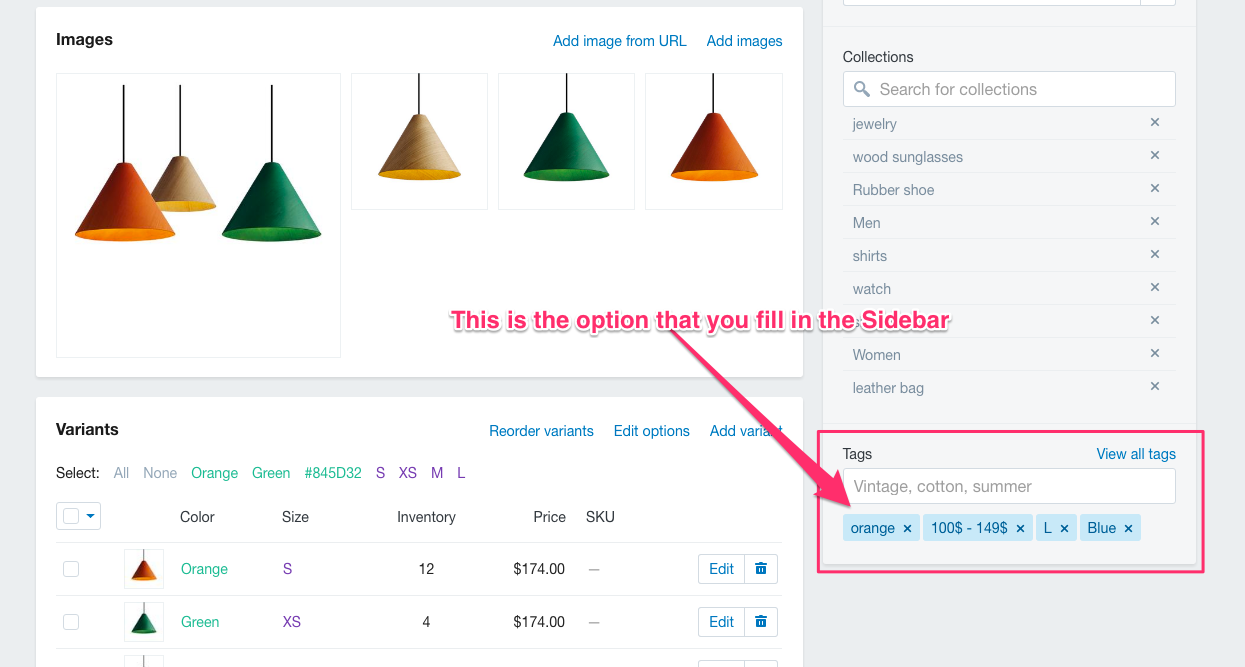
Sidebar & Advanced Filtering
Advanced Filtering sidebar is built on top of Tags of Shopify. To make the feature work, you need to configure options in theme setting and add tags to your products (like variant option)
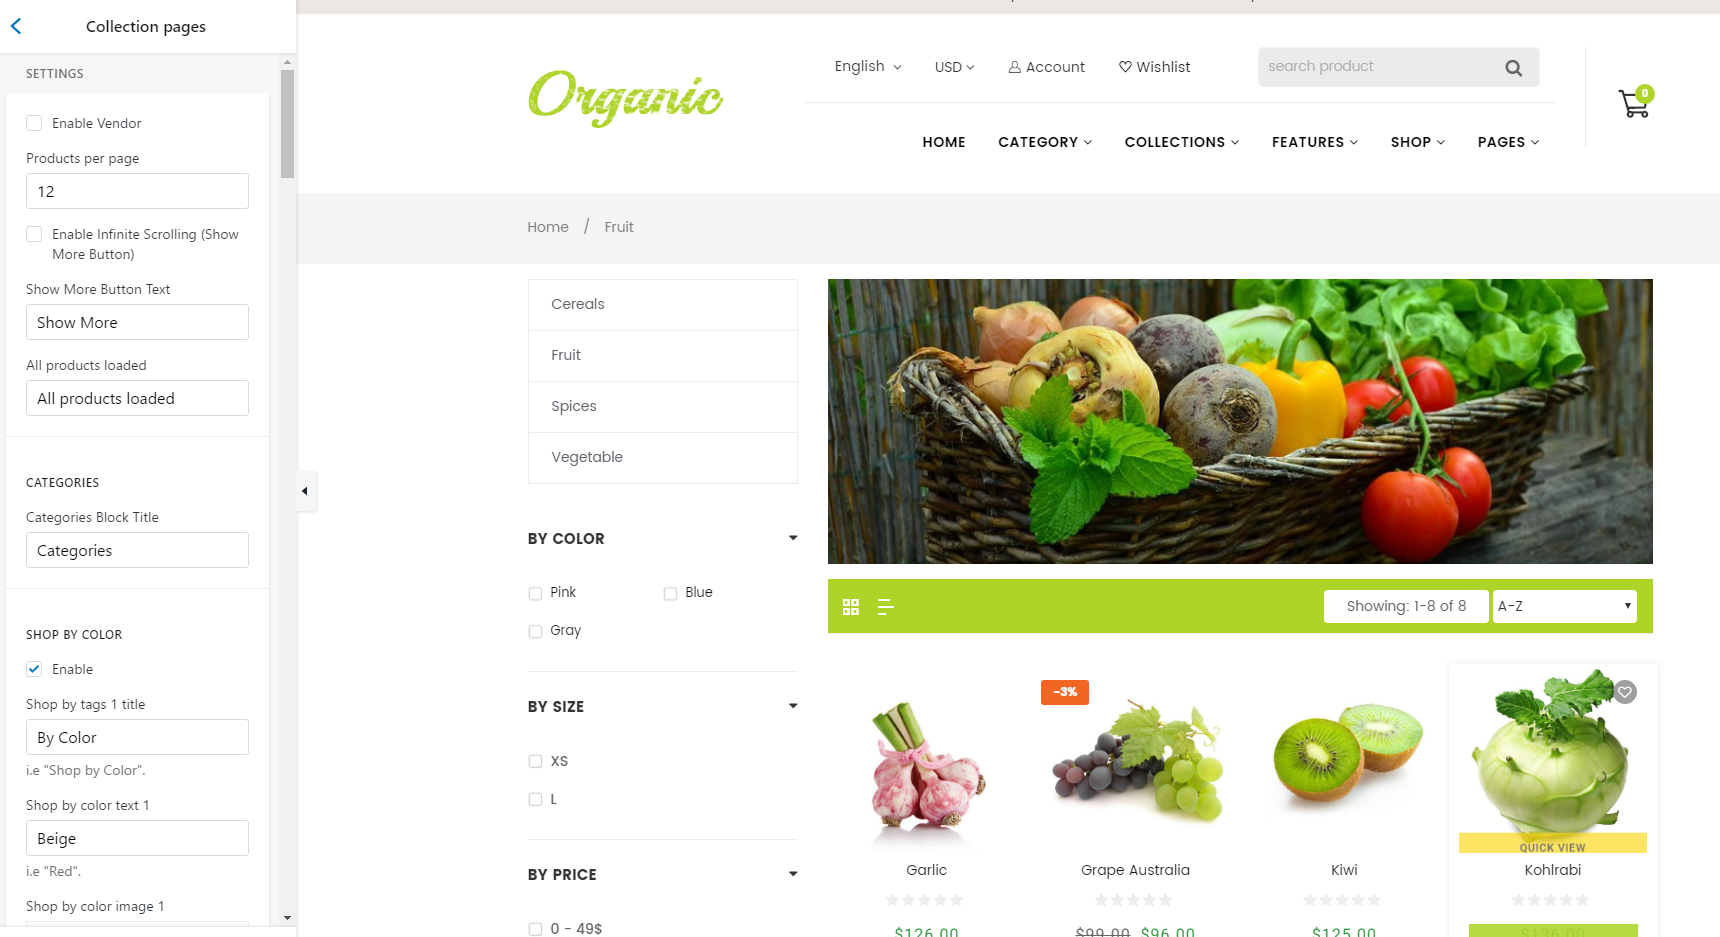
To use advanced filtering as in our demo page (https://Organic-01.myshopify.com/collections/all), you need to do following steps:
Step 1, 2 3: Login to your Shopify admin panel and go to Themes -> Customize Theme -> Collection:

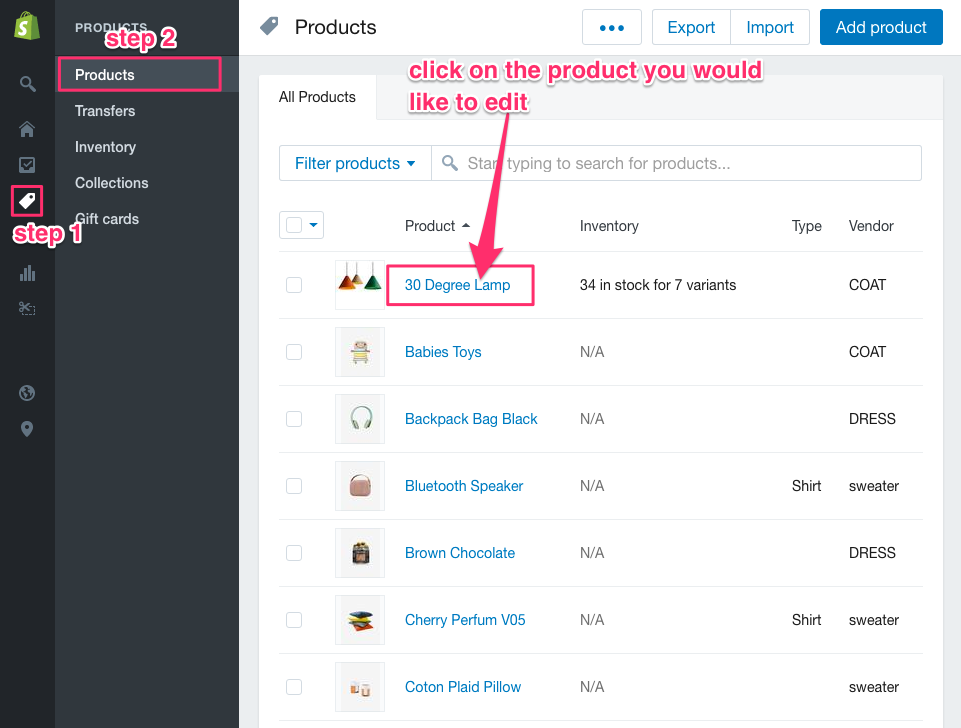
Step 2: Go to Products, click on the product that you'd like to show these options.
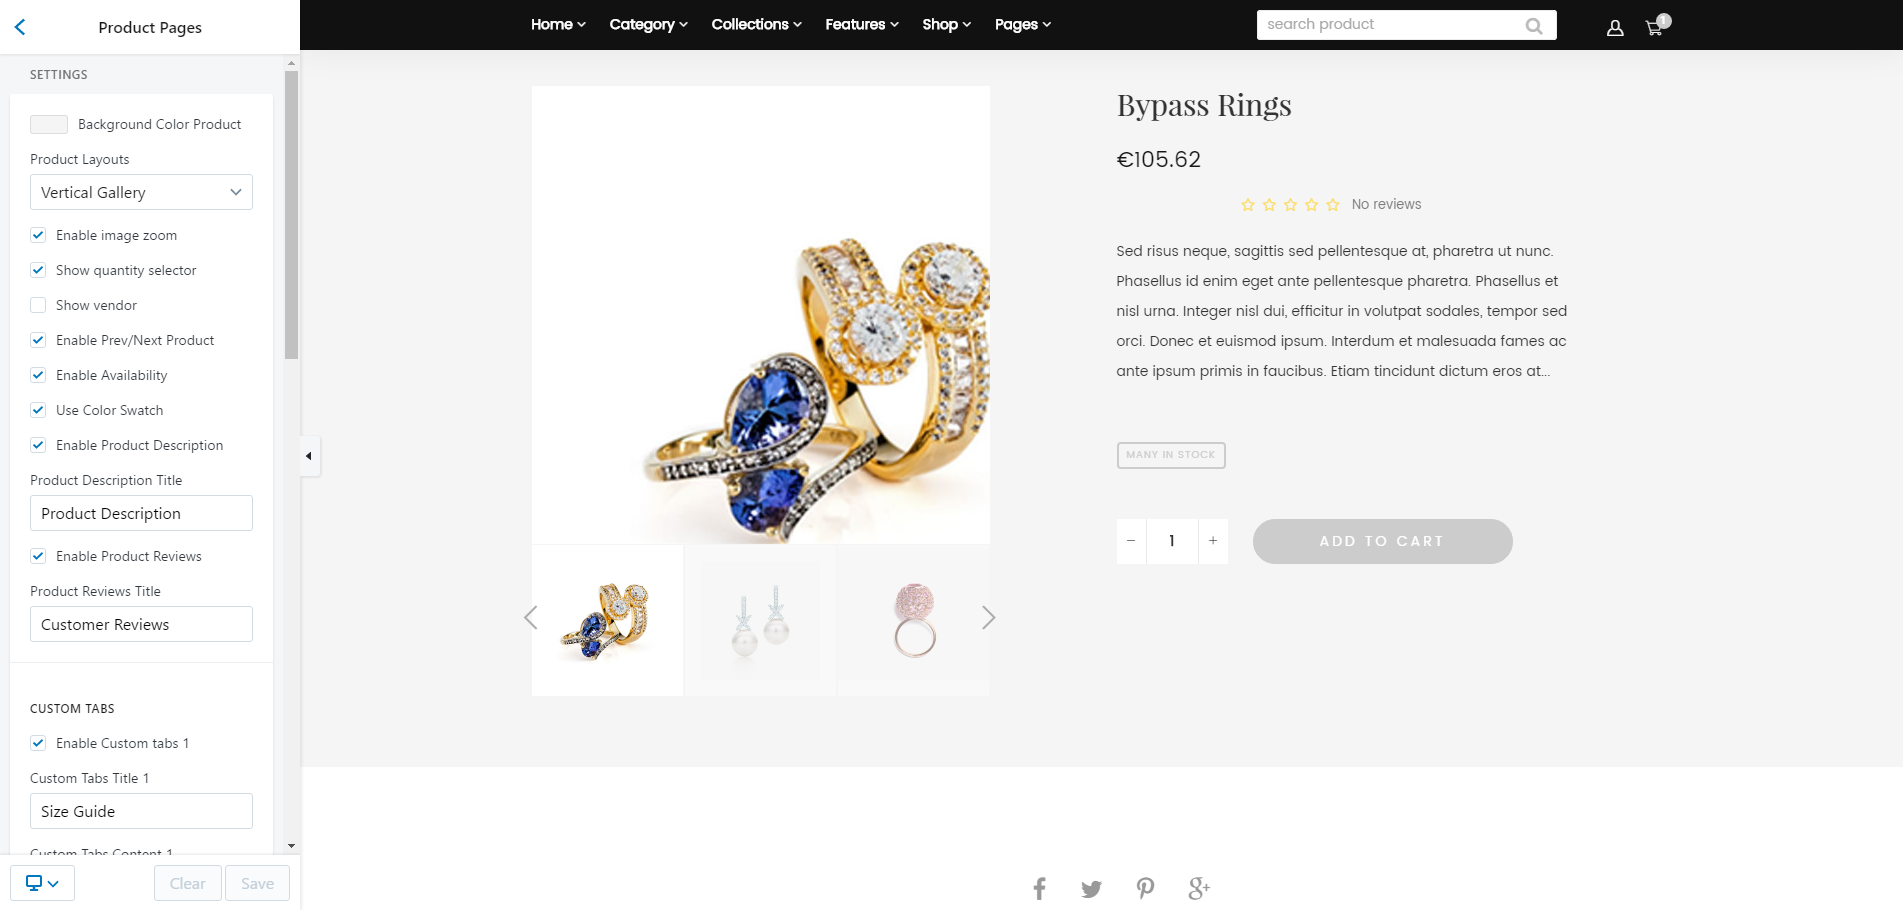
Product Detail Page
Step 1, 2 3: Login to your Shopify admin panel and go to Themes -> Customize Theme -> Collection -> Select a Product:
Footer
You can setup footer in theme settings page under the Footer section.

Navigation/MegaMenu
Navigation
Navigation on your Shopify website is controlled by menus and links. Each menu contains links which visitors can click or tap to explore your website.
Before starting this section, we strongly recommend you to check the following guide to know how to control Shopify's navigation:
- Default menus
- Adding a new menu
- Create a menu
- Make a new menu visible on your website
- Create a drop-down menu
- I don't want to drop down from Catalog – can I drop down from another button?
- Add a link to a menu
- Edit link names
- To edit the name of a link on your storefront
- Change the listing order of links in a menu
- Delete links from menus
Dropdown Megamenu
Firstly you should decide for which menu item in your Main menu you'd like to have as a dropdown megamenu. In this example, we will show you now how to create mega menu for "Collection" item.
MegaMenu Structure
Please make sure you have all navigation structure like the following image:
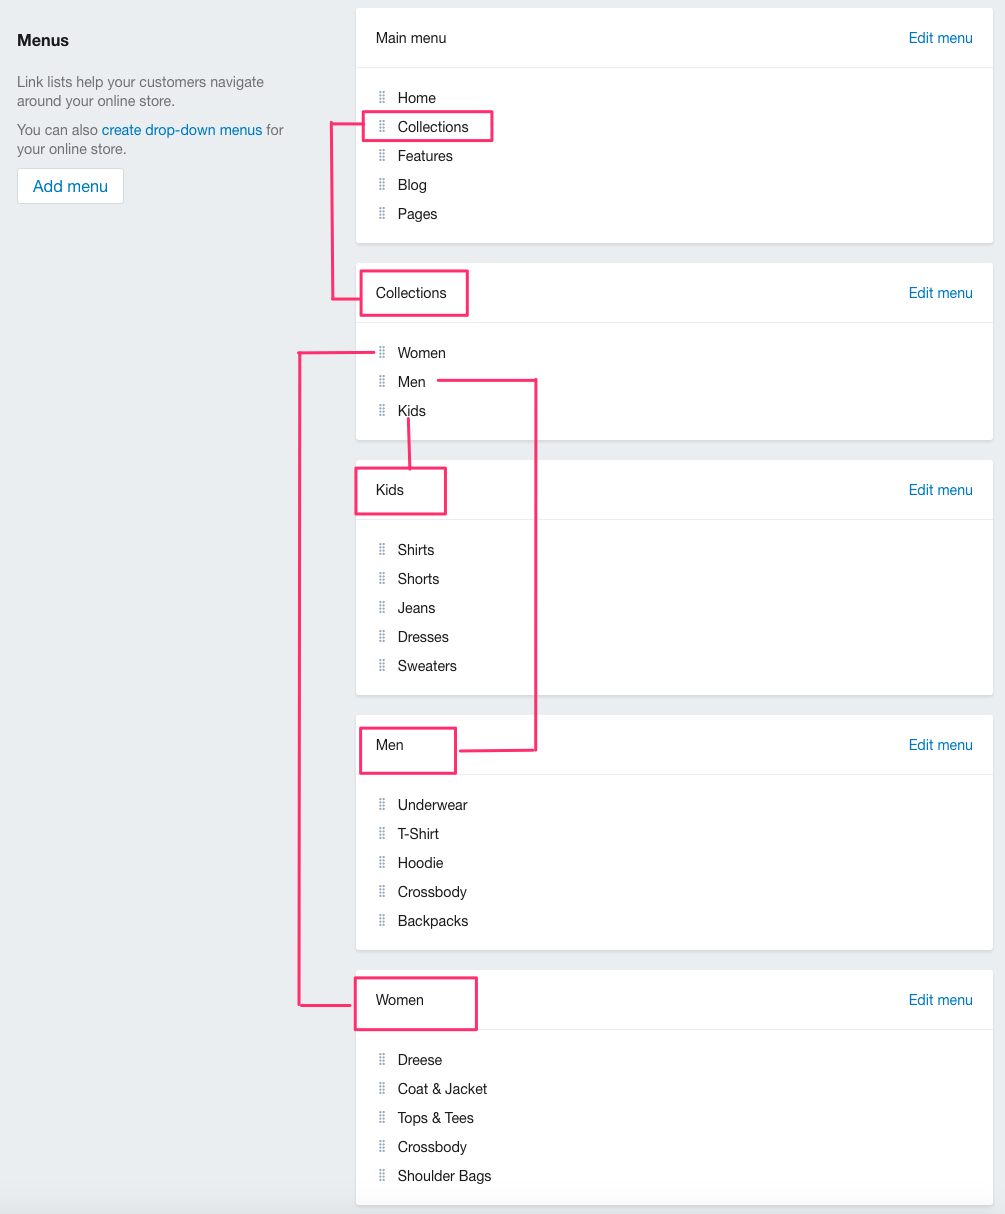
Again, we strongly recommend you to check this guide Create a drop-down menu to know how to create that menu structure.
Creating Dropdown MegaMenu
Step 1: Go to Online Store -> Themes -> Customize Theme -> Mega Menu
Step 2: Check the Enable MegaMenu
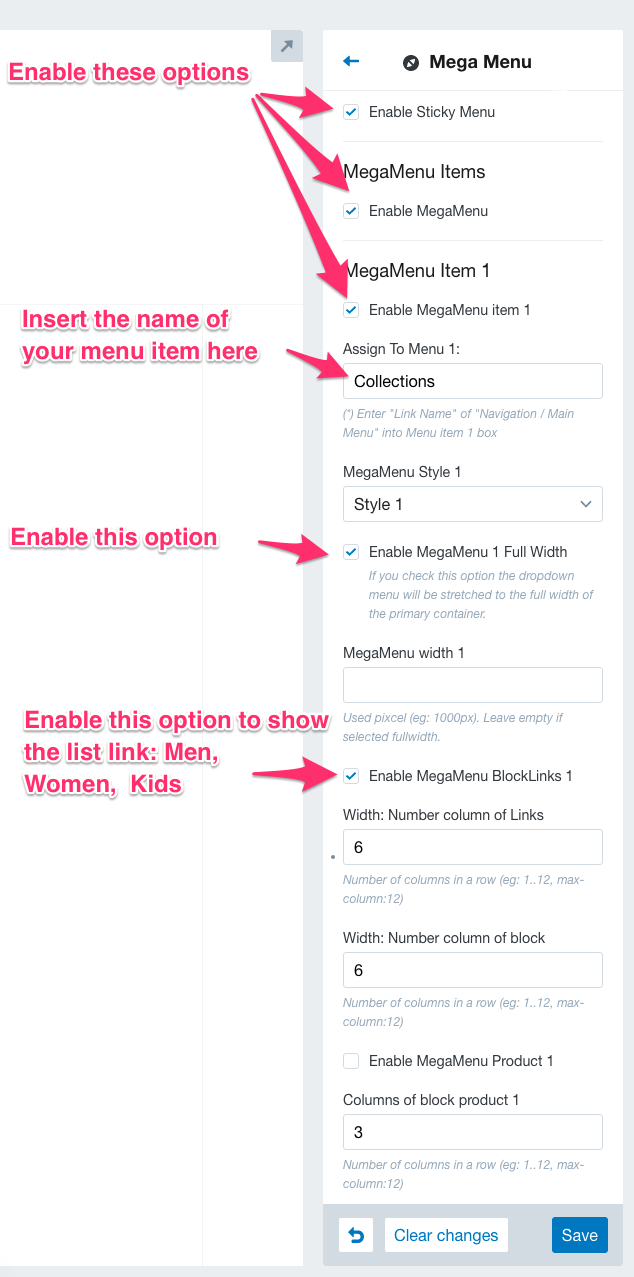
Step 3: Add Background Image for Dropdown Megamenu

Specific Options
We are having 5 Mega Menu items from Mega Menu item 1 to Mega Menu item 5. You can enable any item with a Mega Menu as you want. Each item stands for the link in the menu.
Each Mega Menu item also have the following specific options:
- Mega Menu Style: You can select any style which you want
- Mega Menu Full Width: enable/disable
- Mega Menu Width
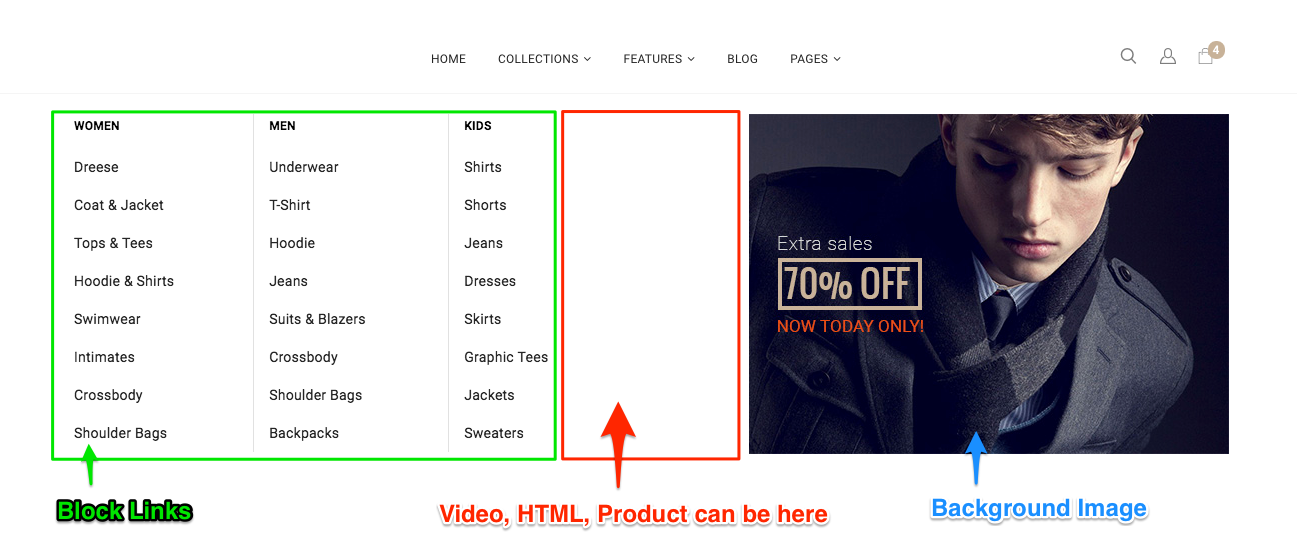
- Mega Menu Block Links
- Mega Menu Product
- Mega Menu HTML Block
- Mega Menu Video
- Mega Menu Background Image
Everything you can do more is only enable Mega Menu item, uploading the photo, entering the number for each columns of block.
If particular type of link is set, you will see its specification in brief step below.This is example for the configuration of Mega Menu item 1.
You also can change the number of columns and image for Mega Menu html.
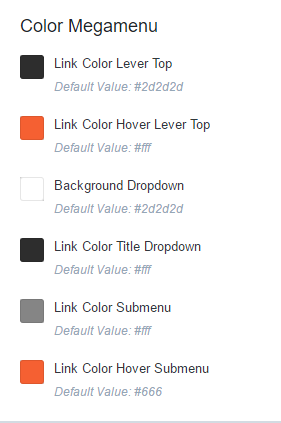
- Color Mega Menu
You can setup color Mega menu in theme settings page under the General tab.
To set the color Mega menu, select the link color code for each title:
Product Settings
Before starting this section, we strongly recommend you to check the following guide to know how to control Shopify's product:
Product Shortcodes
The shortcode generator is what you need. The shortcodes allow you to build pages easily and quickly.
[label-icon-new]: Add label new to your product.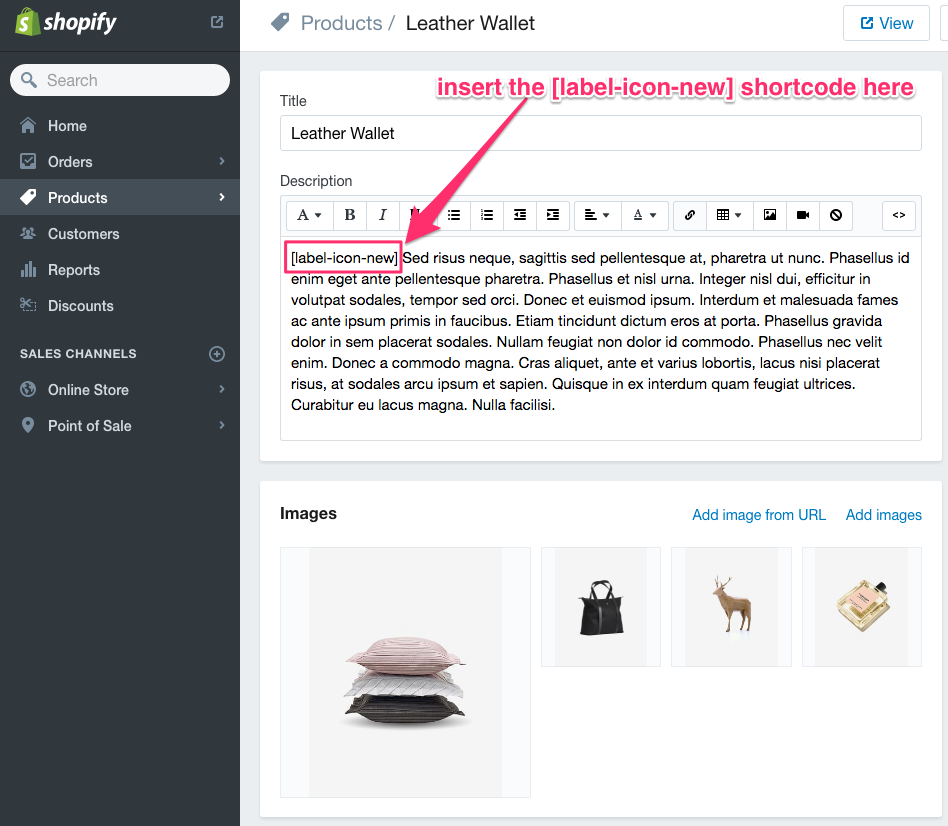
[short-description]Your Custom Description Here[/short-description]: Manually add a customizable short description for the product.[item-gallery]: Enable image slider for the product in the collection page or home page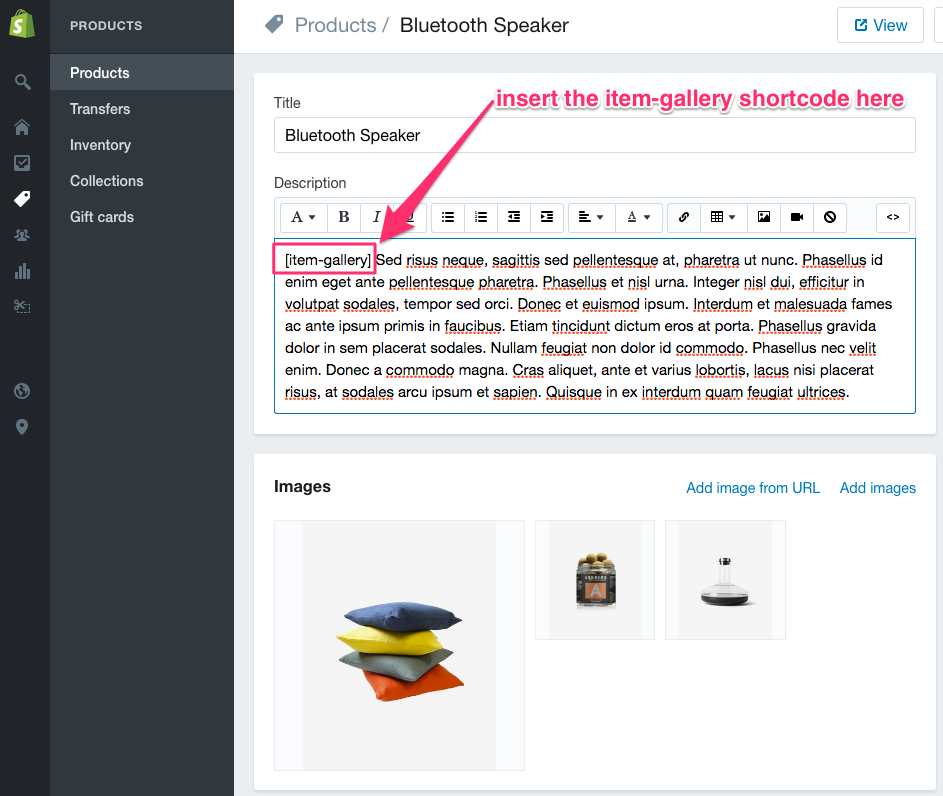
[video]your youtube or vimeo video link here[/video]: Add embed video to separately product page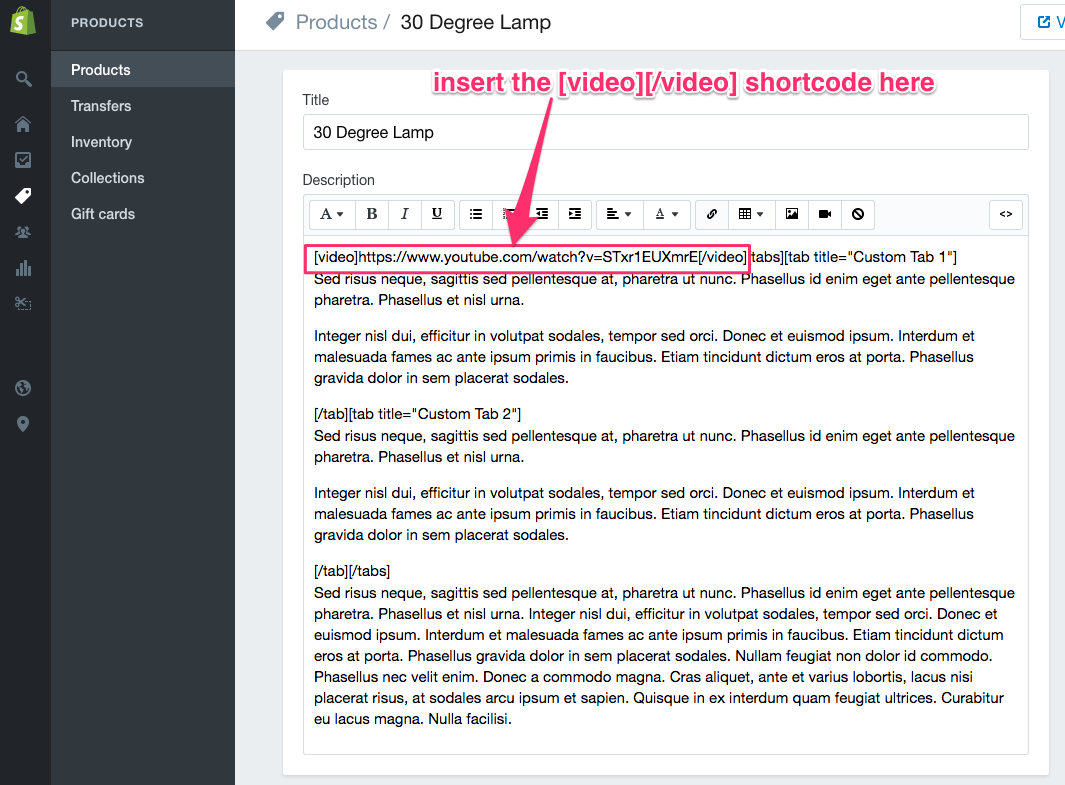
[countdown]2018/08/22 11:59:00[/countdown]: Add countdown timer in every special product page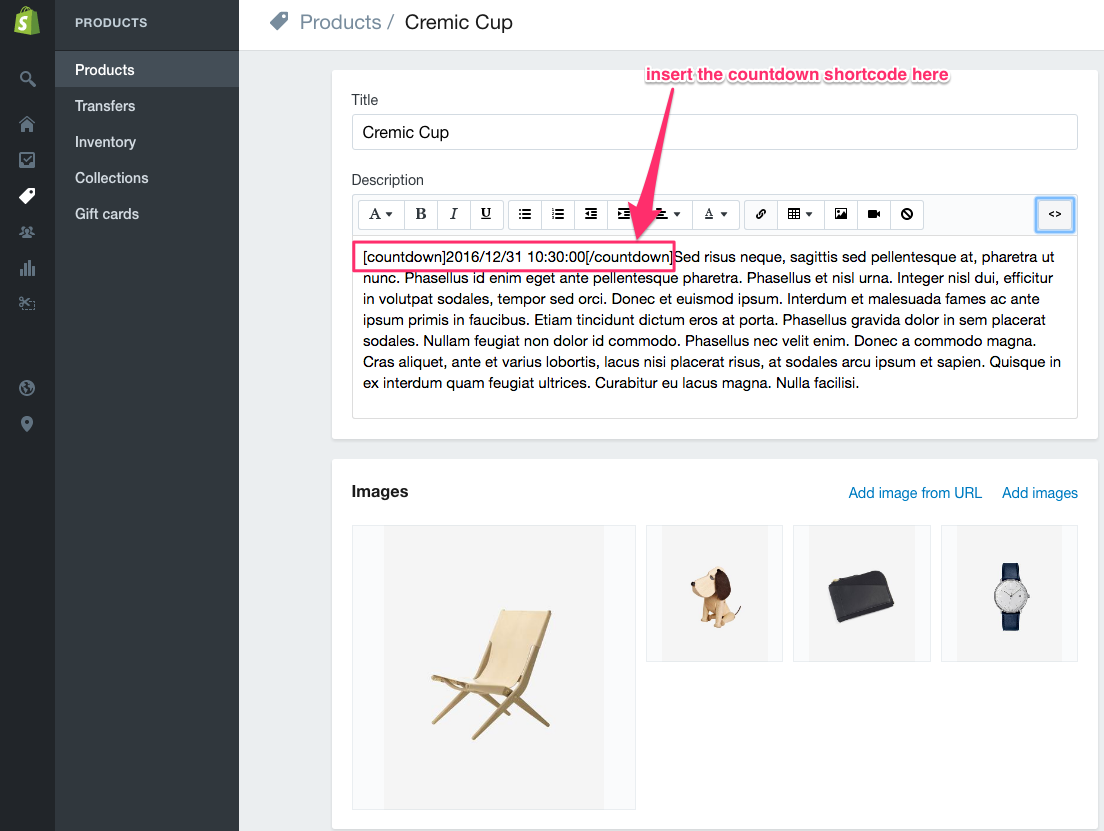
- Add unlimited individual/unique tabs for special product page
[tabs]
[tab title="Custom Tab1"]Content 1[/tab]
[tab title="Custom Tab2"]Content 2[/tab]
[tab title="Custom Tab3"]Content 3[/tab]
[/tabs]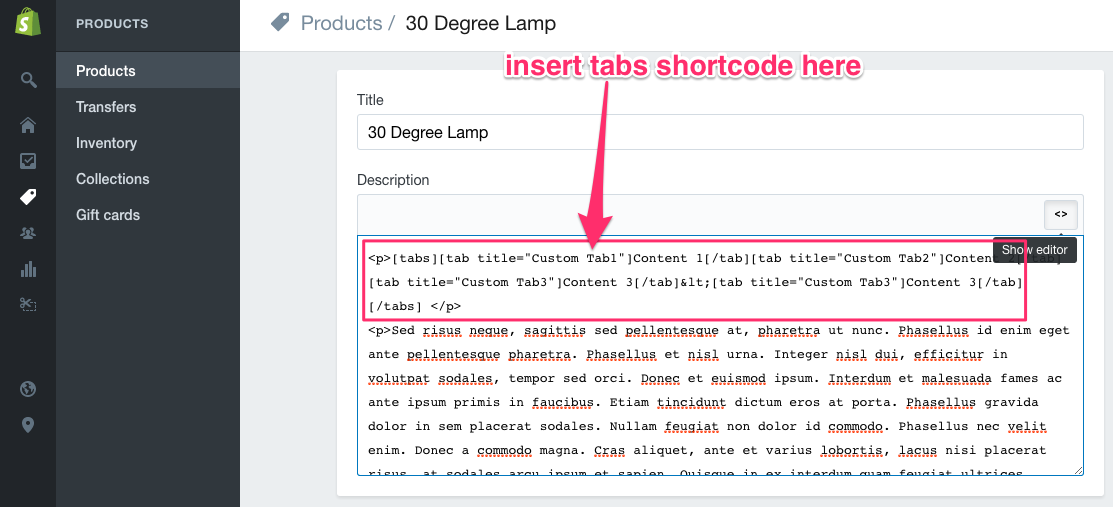
Product Tabs
We do provide 2 options for adding custom tabs to the product:
- You can easily add up to 4 general customizable tabs for all products: Just go to Themes > Customize theme > Product Detail > Custom Tabs > Enable Custom Tab Item as bellow image
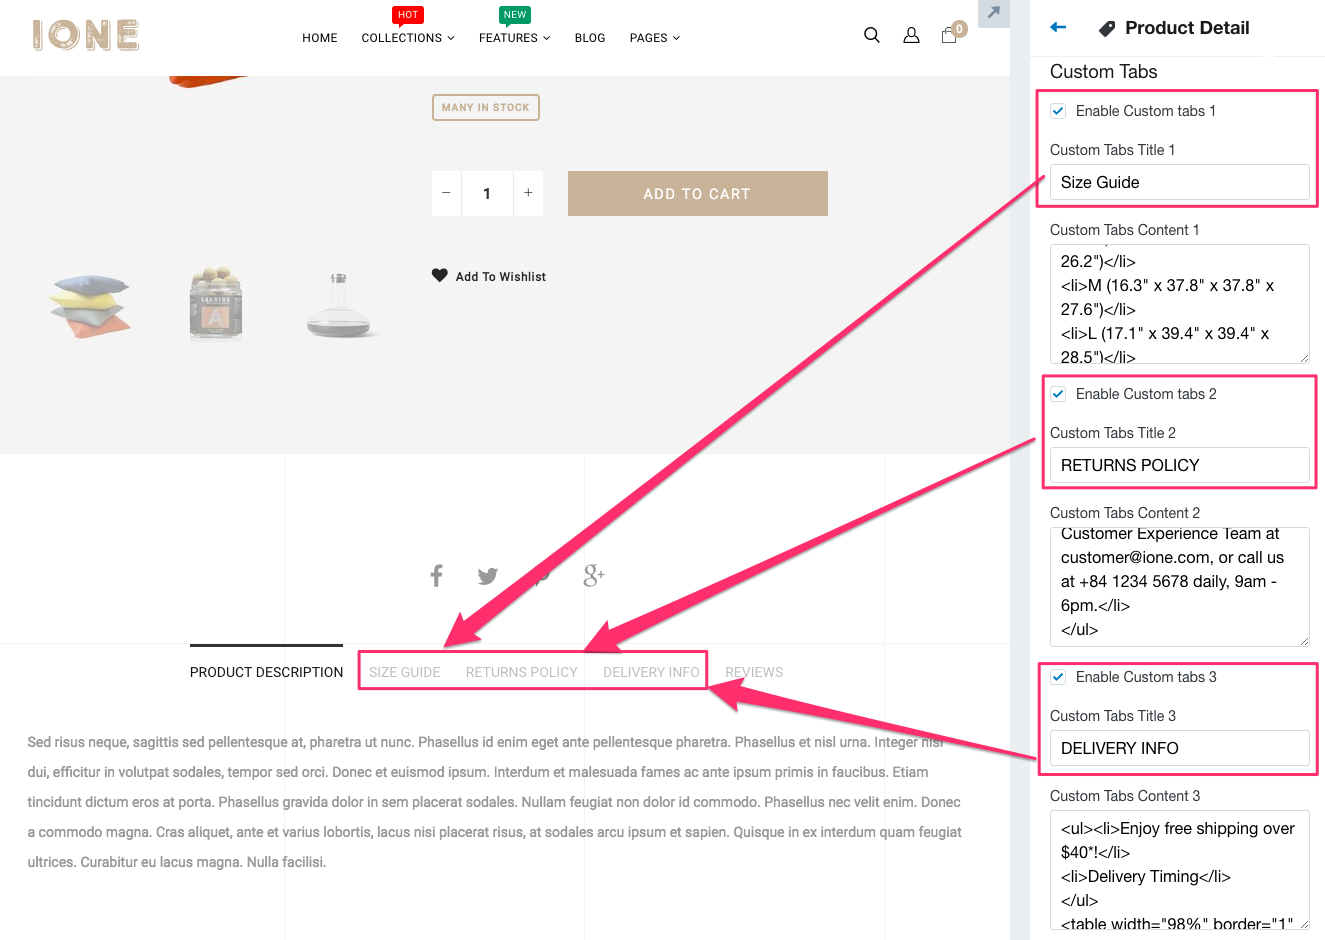
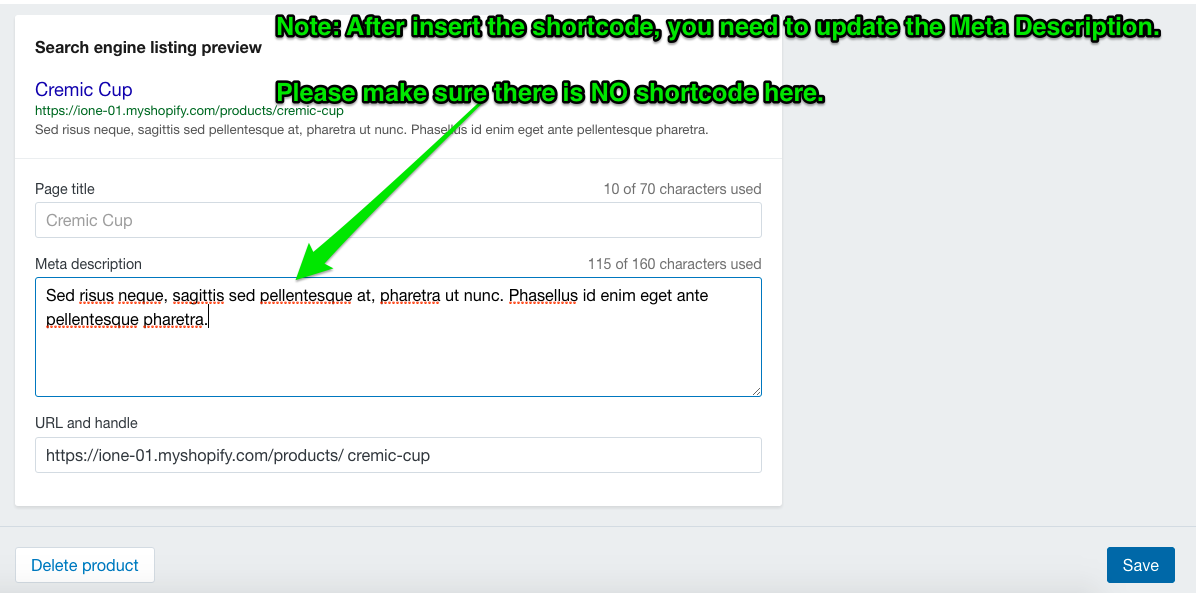
- You can easily add unlimited individual/unique tabs for special product by using [tabs] shortcode
Note: After insert the shortcode, you need to update the Meta Description.
Please make sure there is NO shortcode here.
Using of Variant
Sometimes the same product is available in different styles or types. For example, you might sell a t-shirt in a number of different sizes, or a hat in a variety of different colors. Create product variants to show your customers all the options they can choose from.
Before starting this section, we strongly recommend you to check the Variants Guide
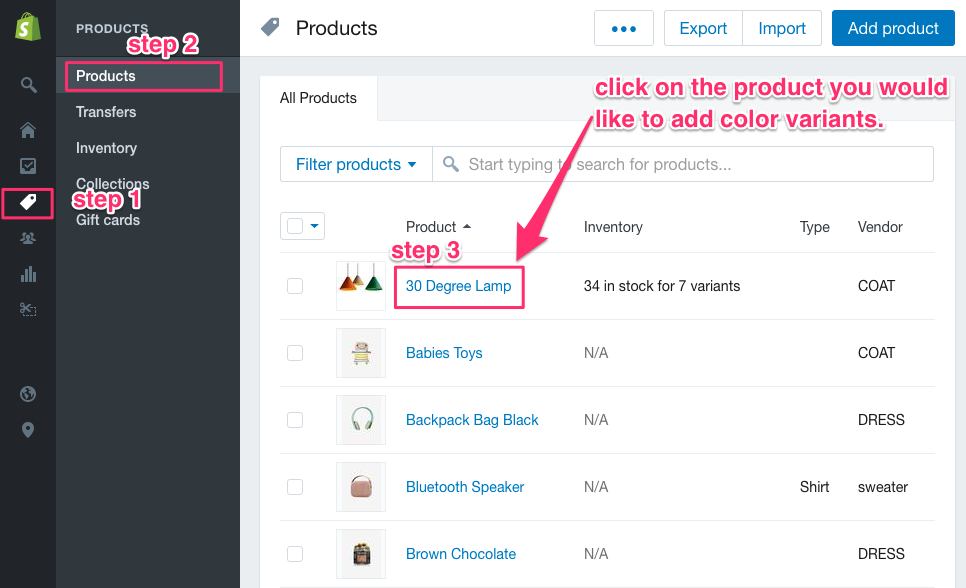
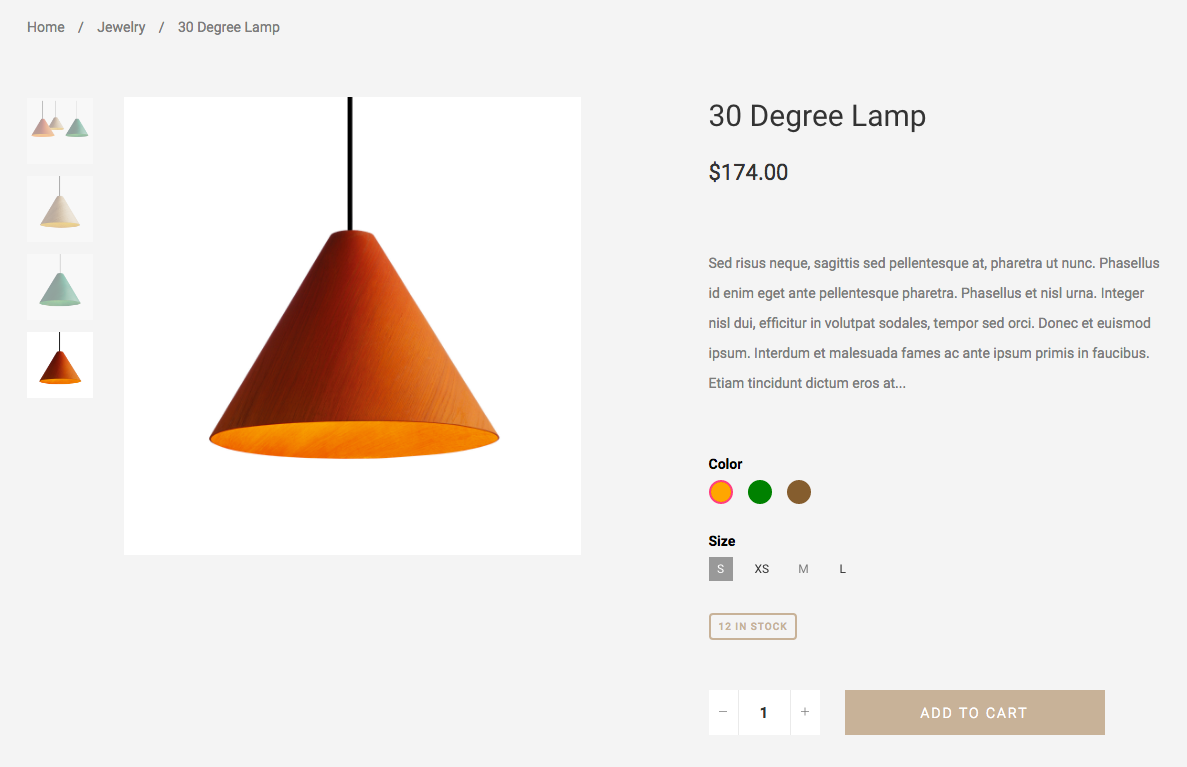
To create product with color variant as in our demo page (https://Organic-01.myshopify.com/products/gold-pyrite-crystal-air?variant=20866714501), you need to do following steps:Step 1: Login to your Shopify admin panel and go to Products, then click on the product you would like to add color variants.
Step 2, 3, 4: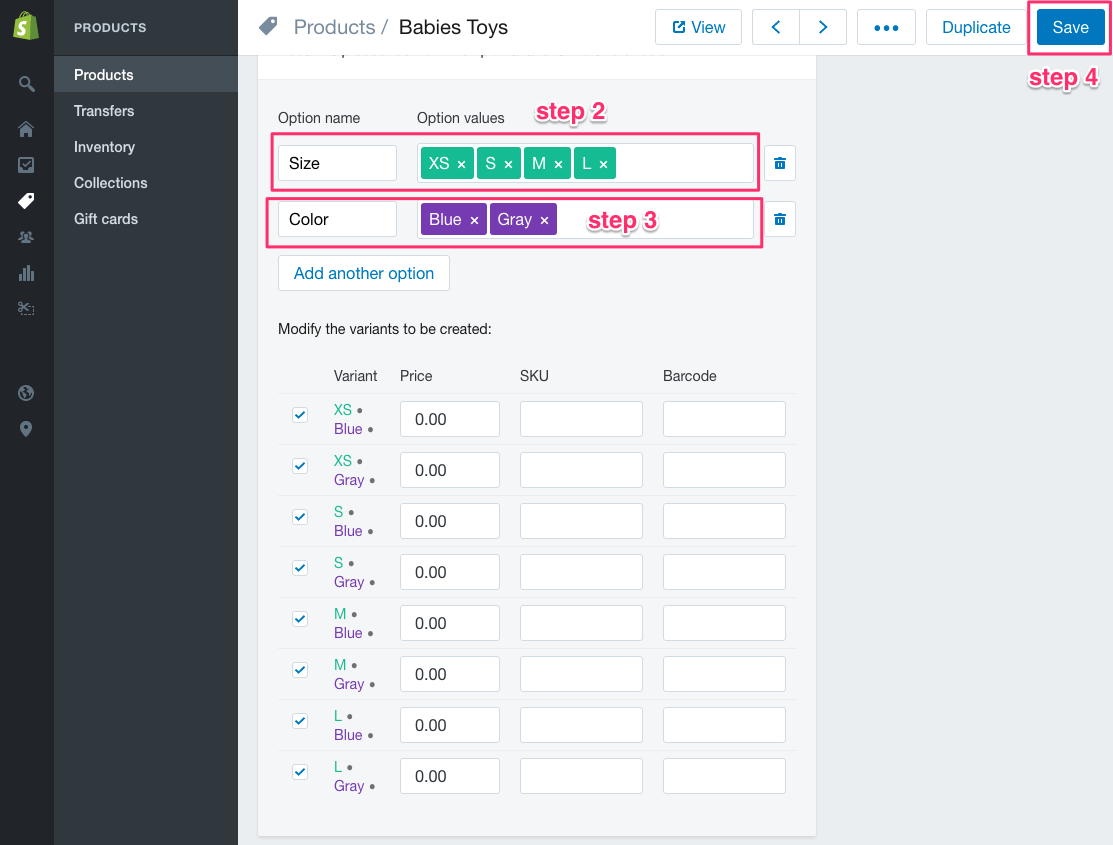
Step 5: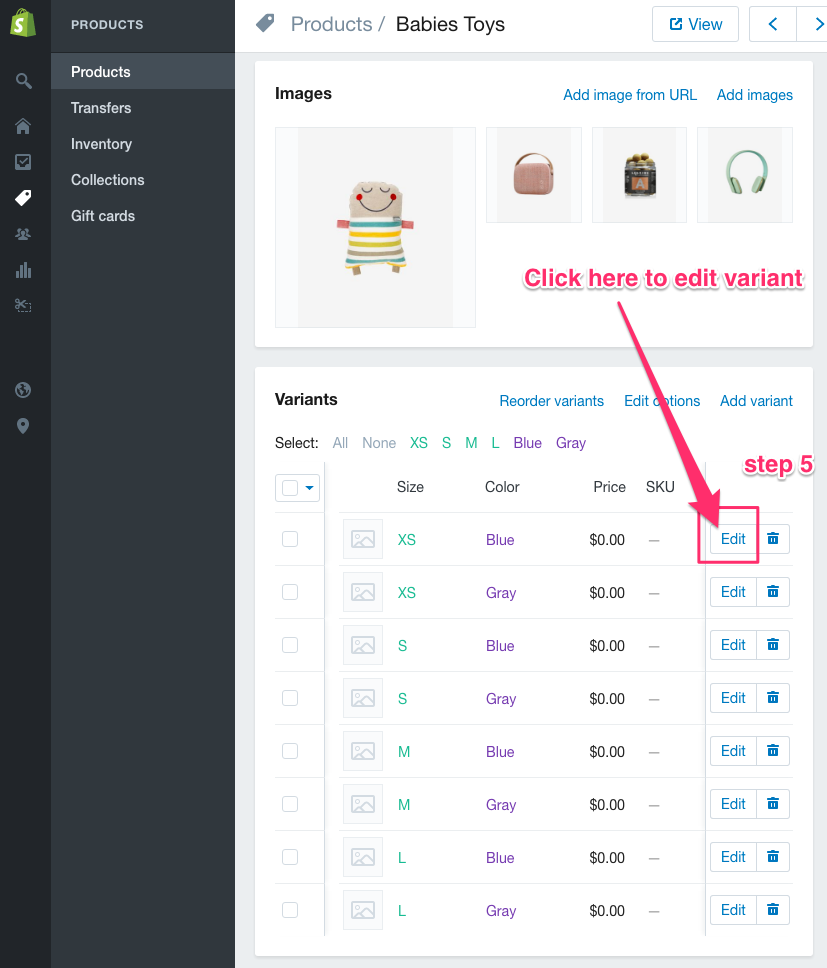
Step 6, 7: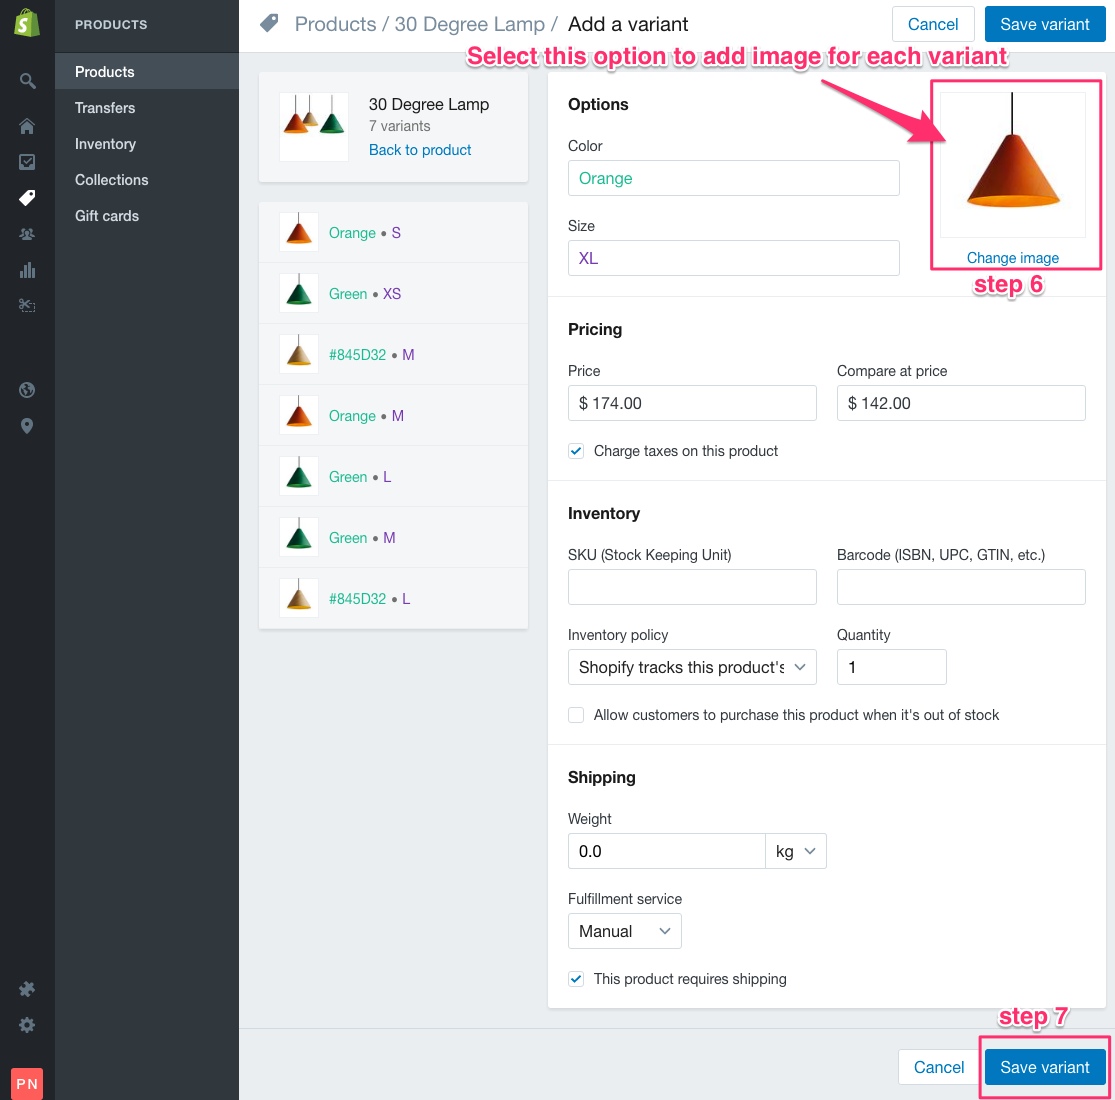
Pages
About
The 'About Us' page of your shop is vital because it’s where users go when first trying to determine a level of trust. This is already a proven fact as our user testing has shown 40% of visitors goes next to About Us page after homepage or after Collections page. Some of those users commented that they need to get know the brand before considering a piurchase. Since trust is such an important part of selling online, it’s a good idea to give people a fair amount of information about yourself and your shop. This is when you need to be as honest and open as possible.
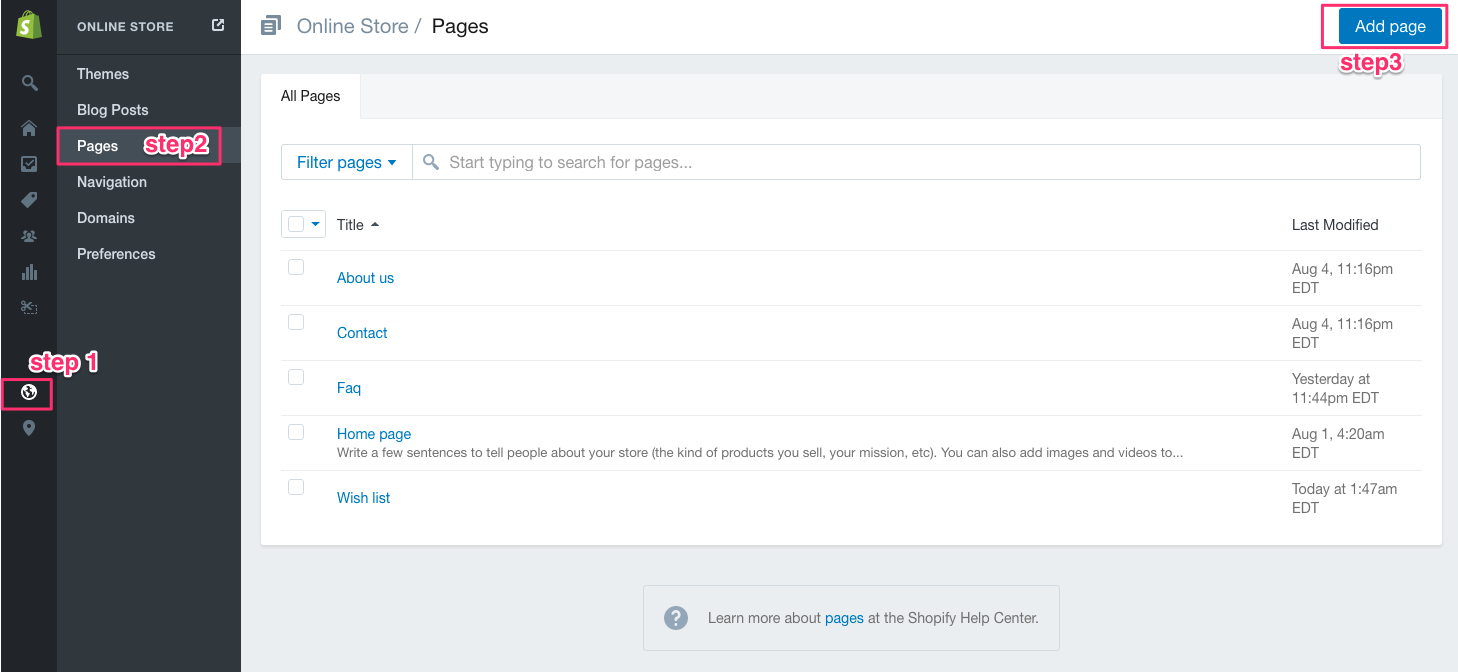
Shopify creates 'About Us' page by default. To change this page, please, go through the following steps:
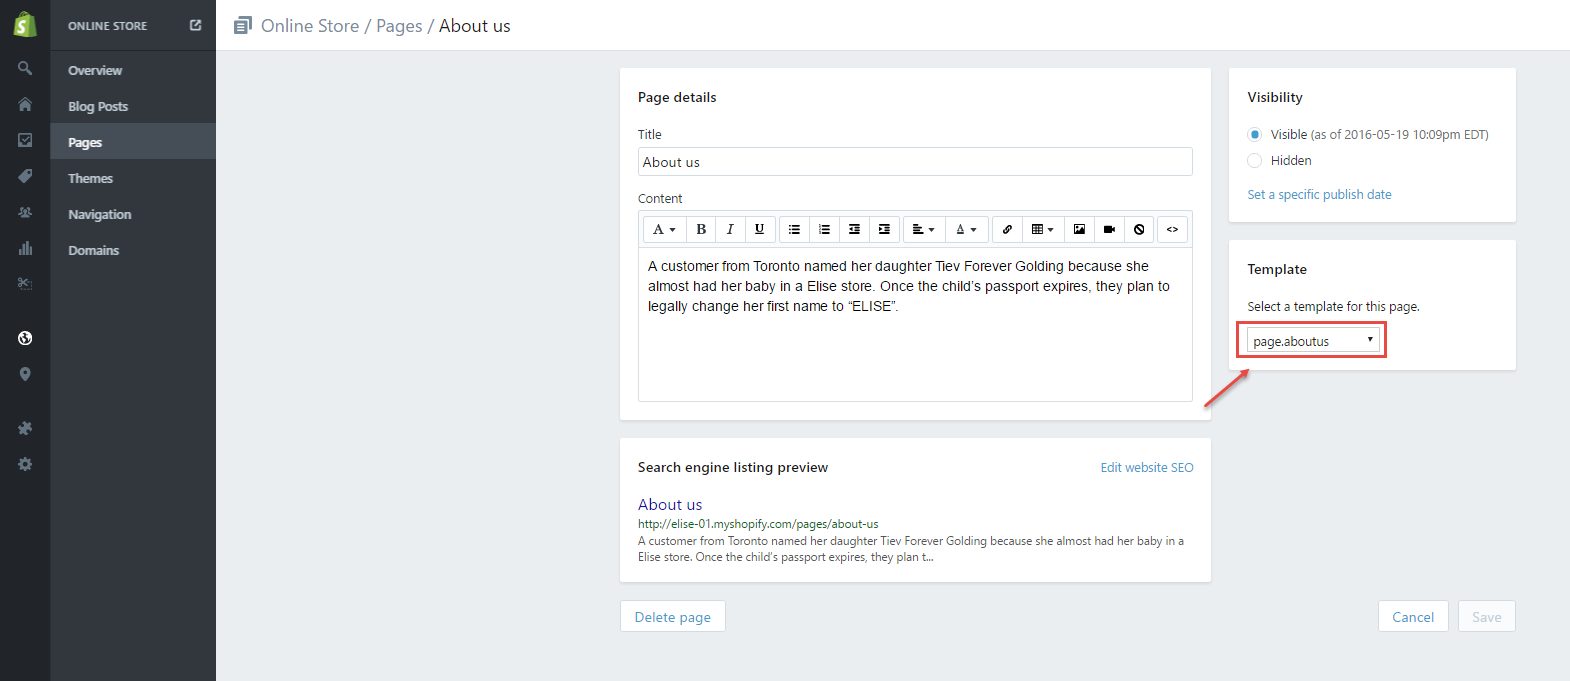
- Go to Online Store > Pages > About us
We've designed a special page template specifically for the about page. In order to use this layout, you'll need to select the page.aboutus template when editing a page.
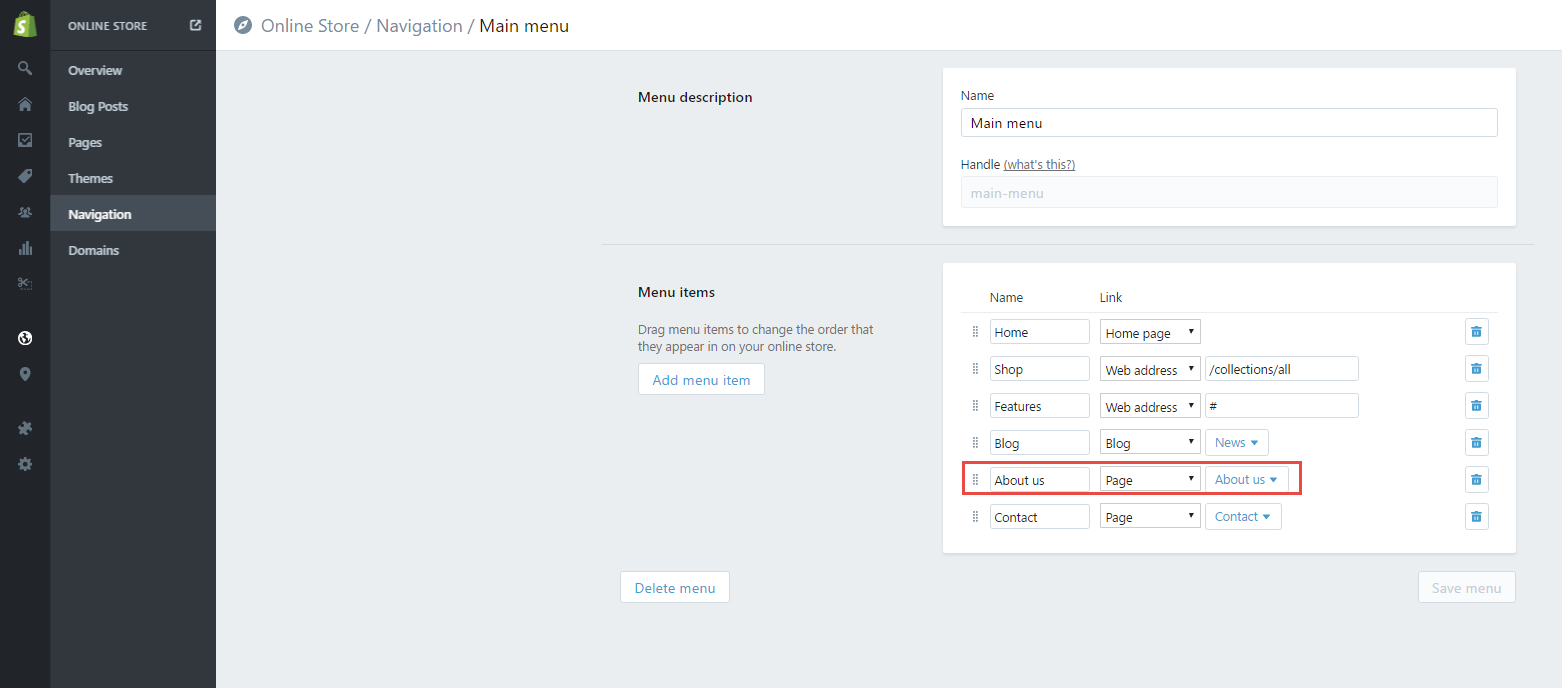
- Go to Online Store > Navigation > Main Menu > Add menu item
- Go to Online Store > Themes > Customize theme > About and enable which contacts you want to use.
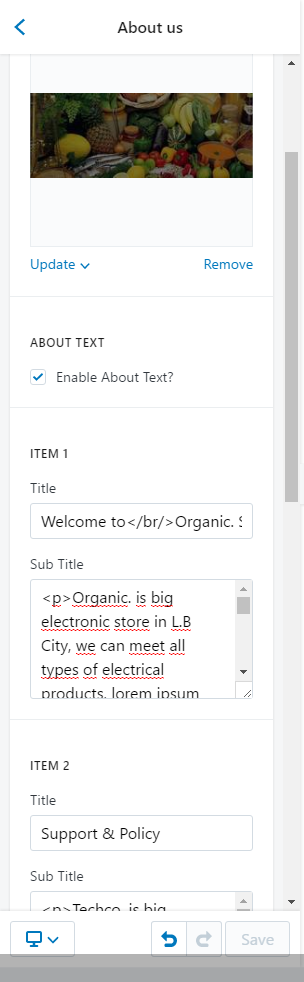
- Save changes
Choose page About us:
Contact
The contact page is the main way your customers communicate with you. Beautiful and welcoming image in the top should tell clients that you are open to communication. One more important thing is to declare different
In order to create a Contact page, follow the steps below:
-
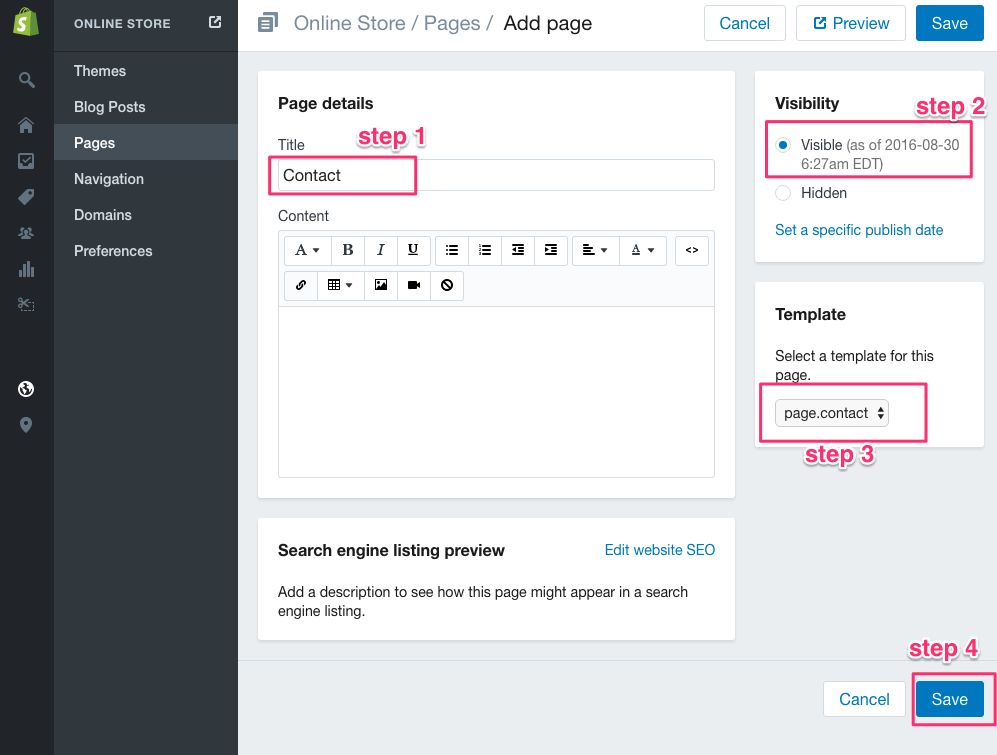
Go to Online Store > Pages > Add page:
We've designed a special page template specifically for the contact page. In order to use this layout, you'll need to select the page.contact template when editing a page.
- Now go to Online Store > Themes > Customize theme > Contact
- Type your store address into textarea. It allows to use HTML tags.
Select the checkbox to hide display Google Maps
Copy the HTML embed code and paste it into the Google Map Code.
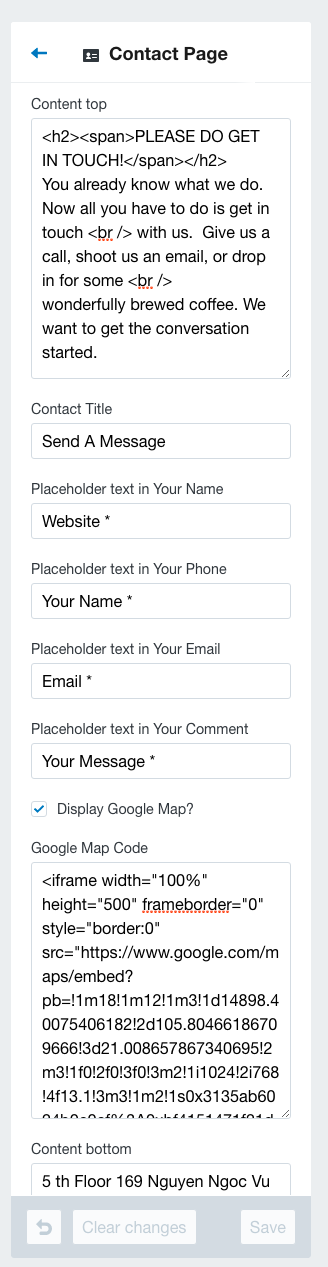
- Save changes
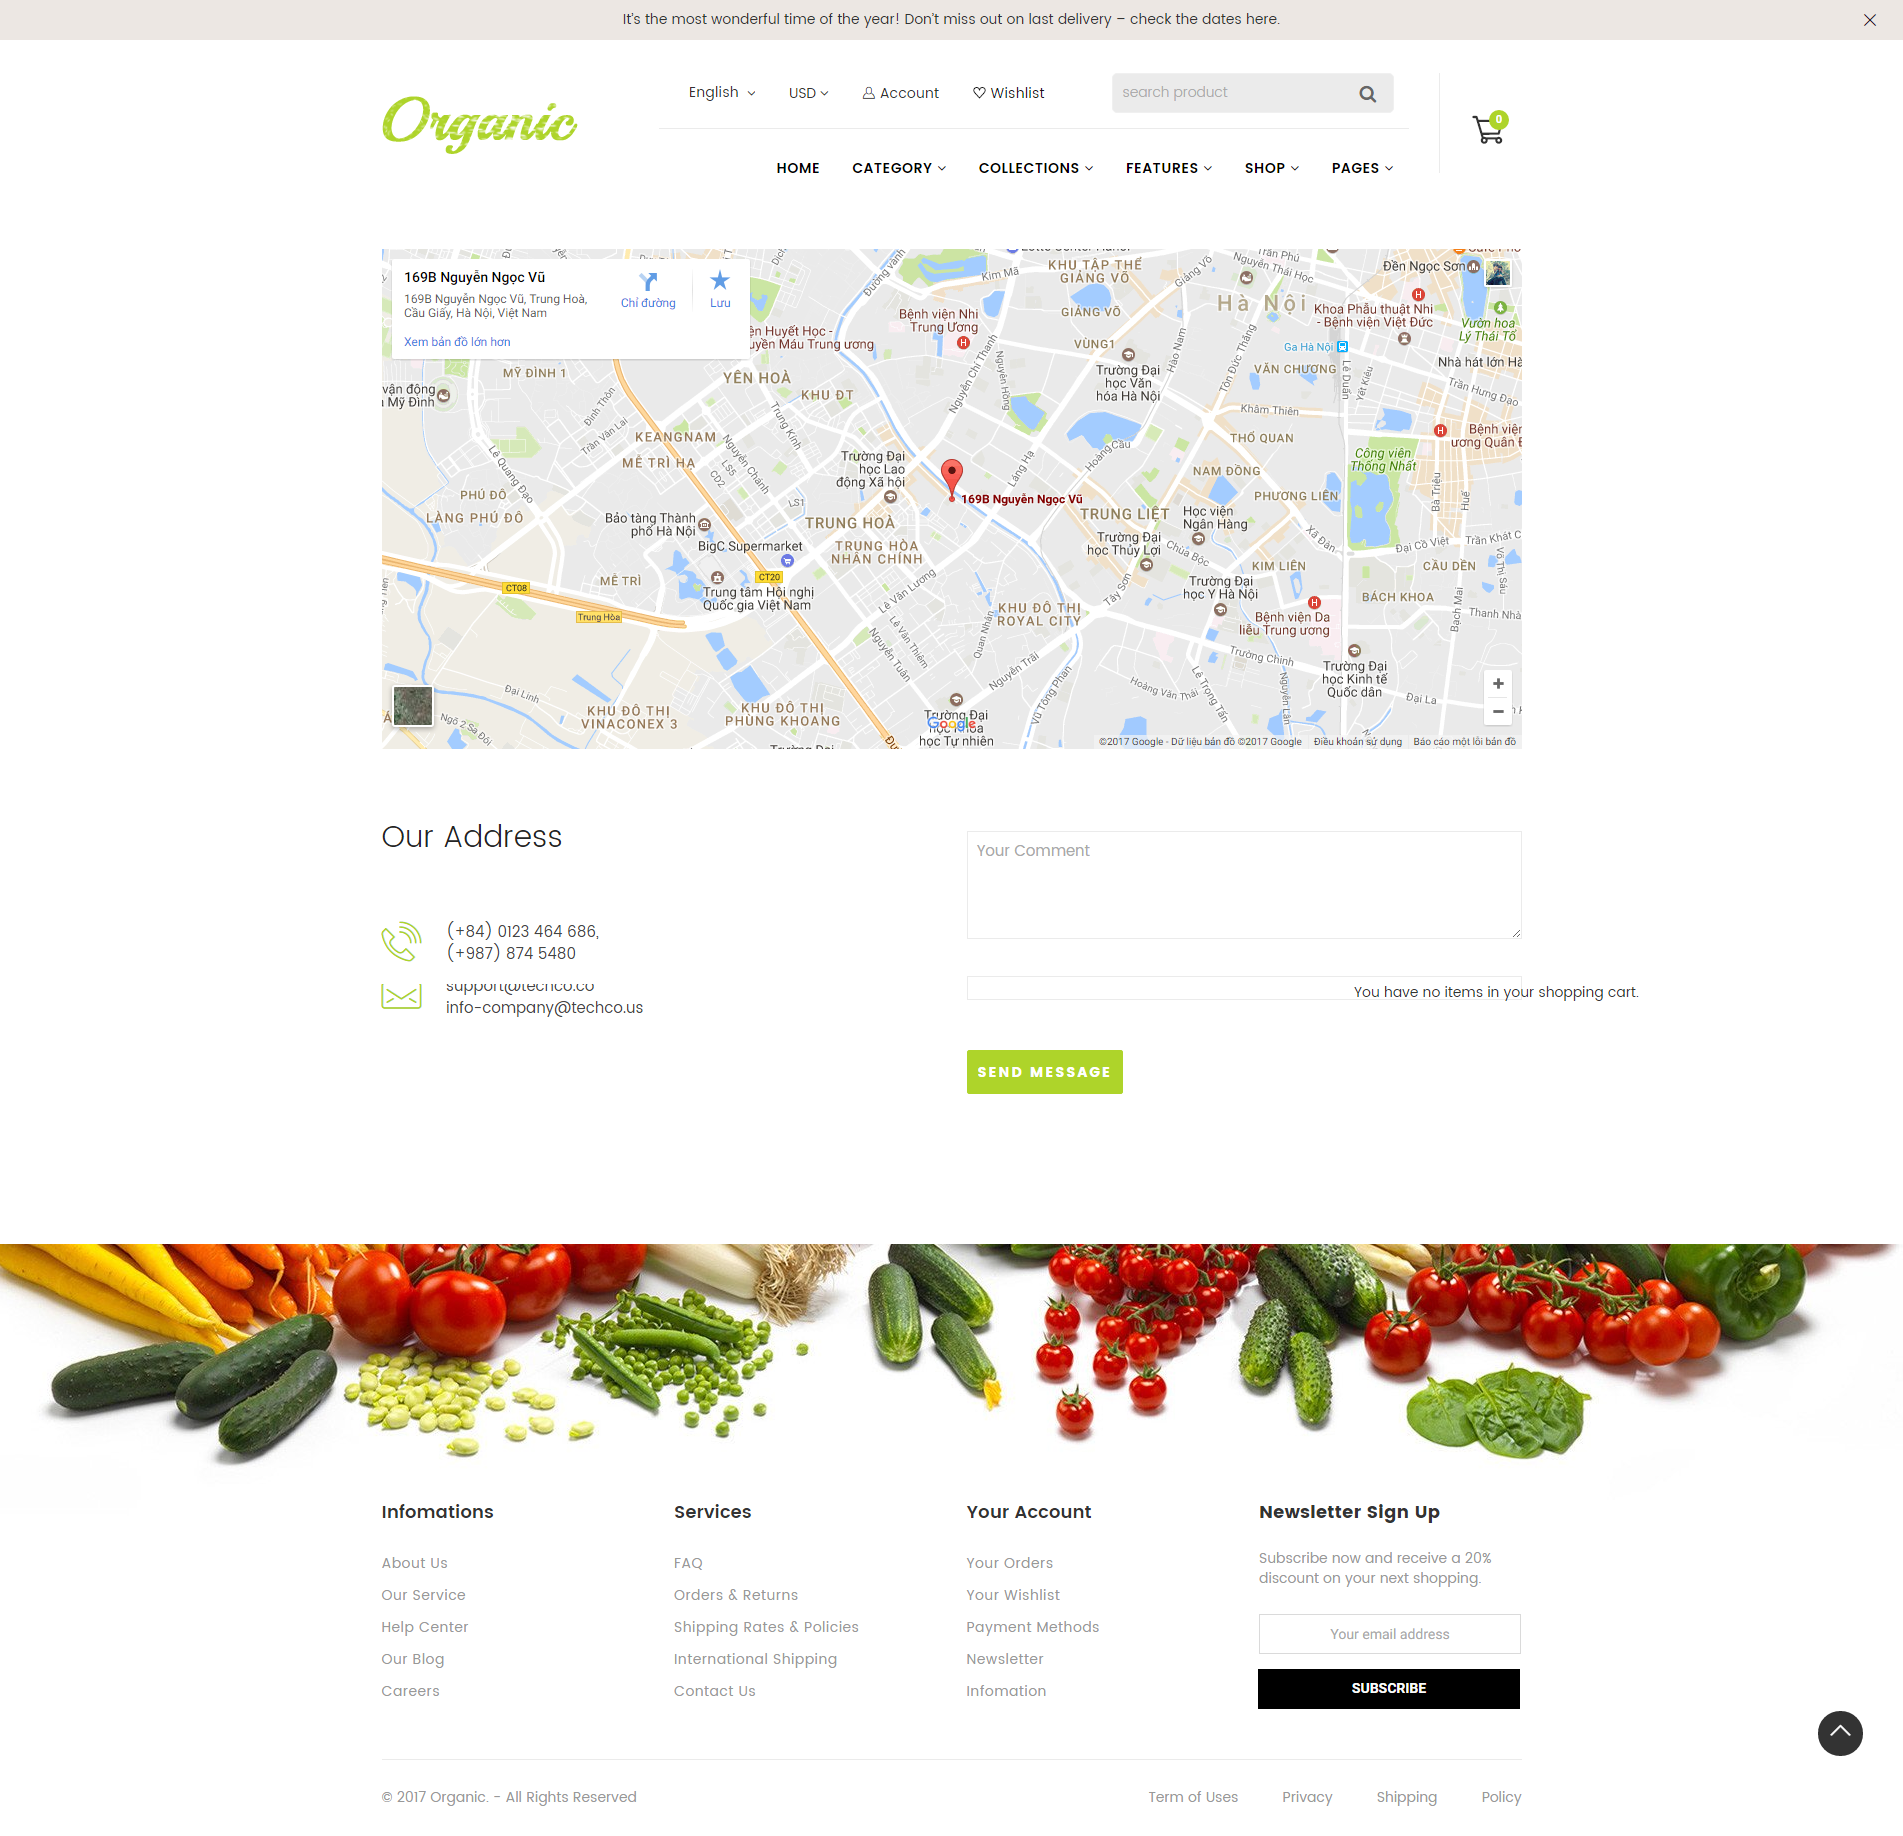
And here is the result:
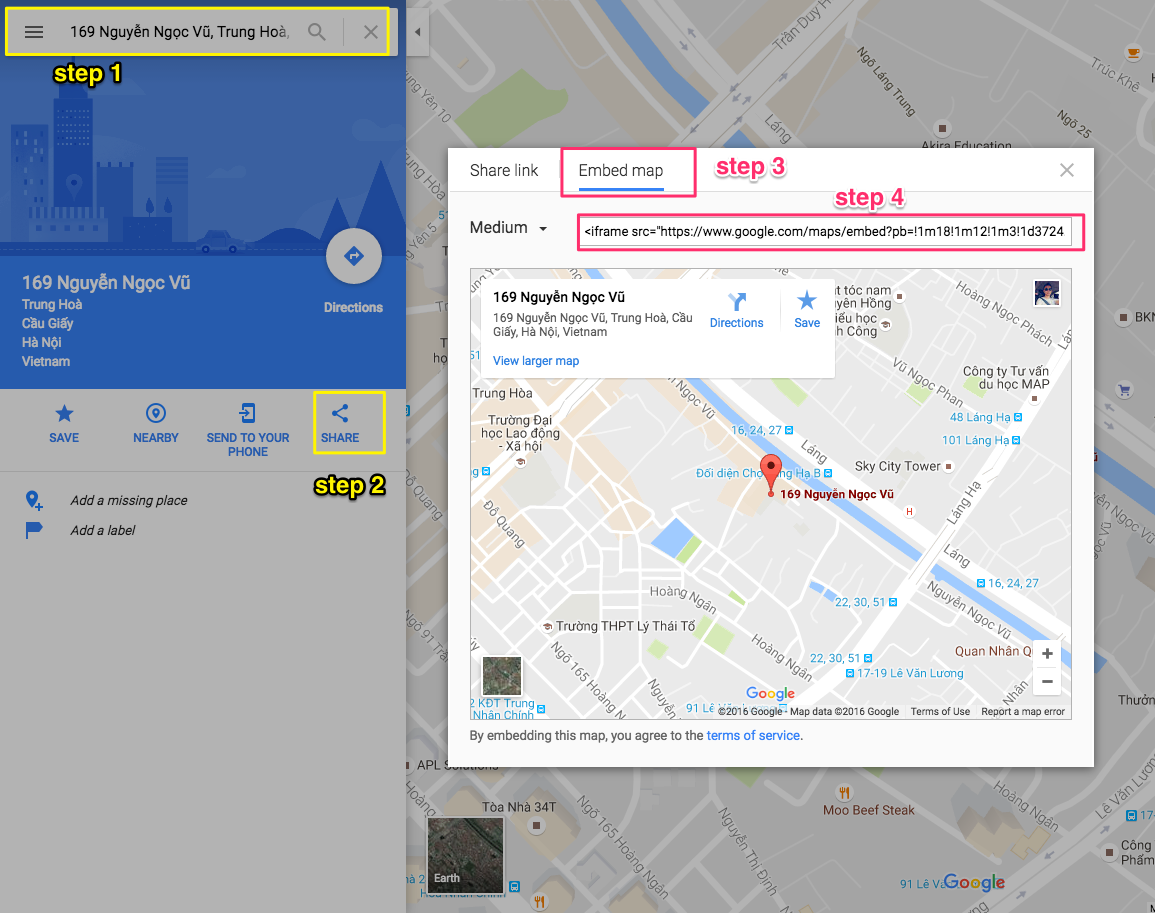
To embed a map or directions in a website or blog, follow the steps below.
- Open Google Maps.
- Make sure the map, Street View image, or directions you'd like to embed shows up on the map.
- In the top left corner, click the Menu icon.
- Click Share or Embed map.
- At the top of the box that appears, choose Embed map.
- Choose the size you want, then copy the HTML embed code and paste it into the source code of your website or blog.
If you are looking for adding/editting contact field, please follow below guide: Adding fields to the Liquid Contact Form
Wishlist
Wishlist page is a list of products that appeals to user's taste. This page serves for the following purposes:
- to keep records of user's most wanted items to buy them later
- to record goods that user buys regularly
In order to create a Wishlist page, please go to Online Store > Pages > Add page:
We've designed a special page template specifically for the contact page. In order to use this layout, you'll need to select the page.contact template when editing a page.
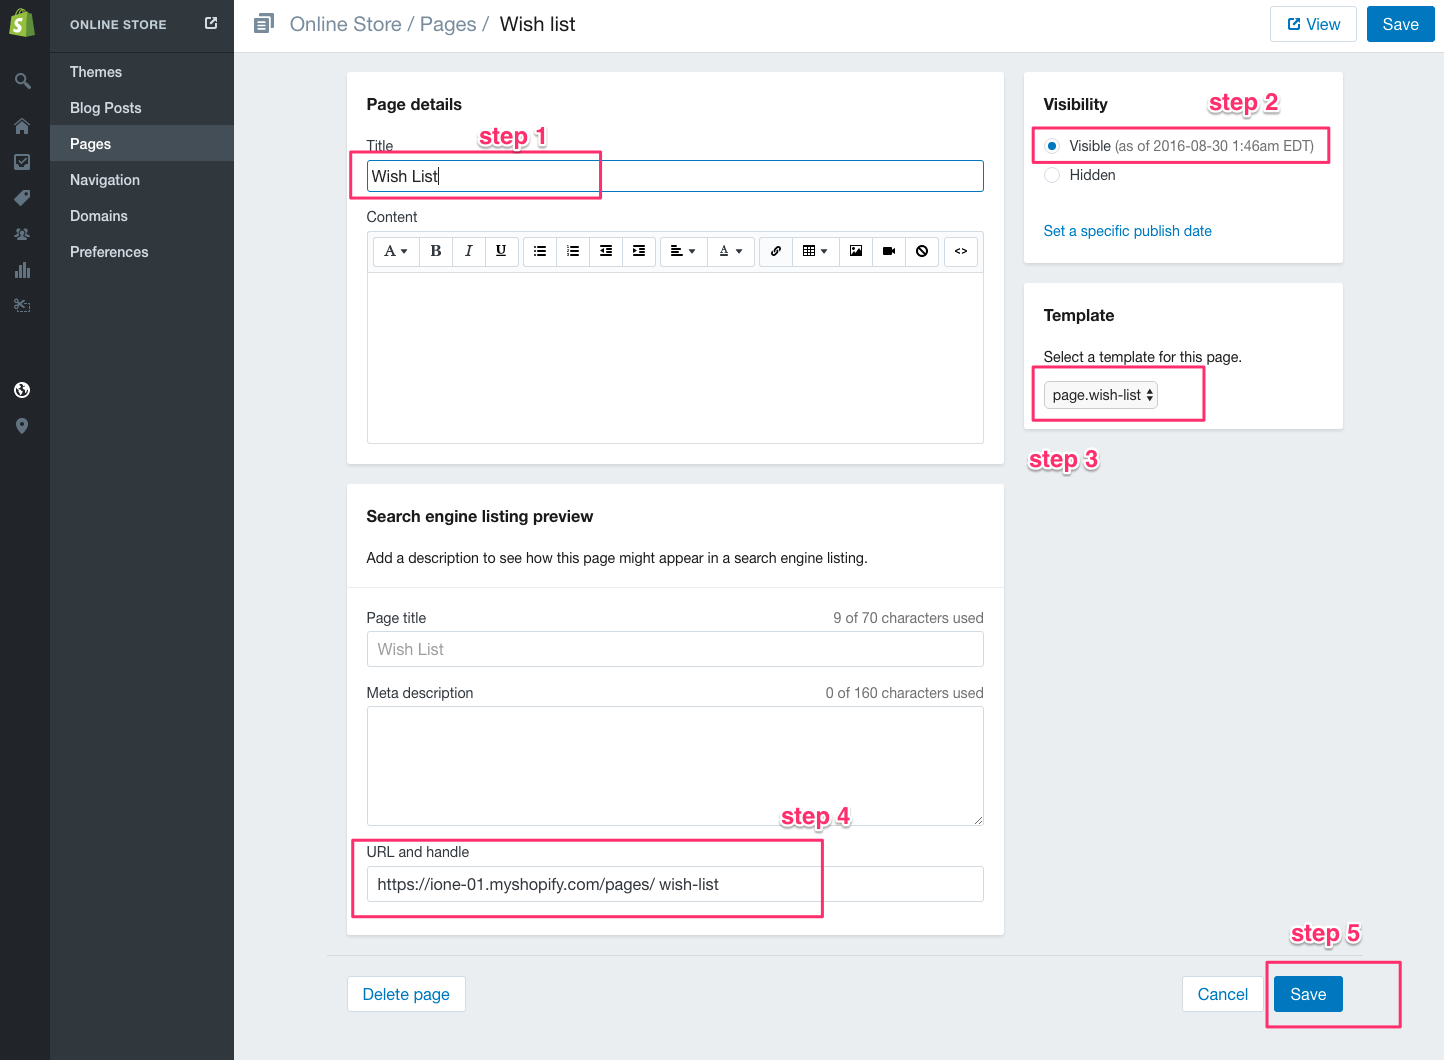
- Save changes
Now go to Online Store > Themes > Customize theme > Wishlist > Enable Wishlist > Save
FAQs
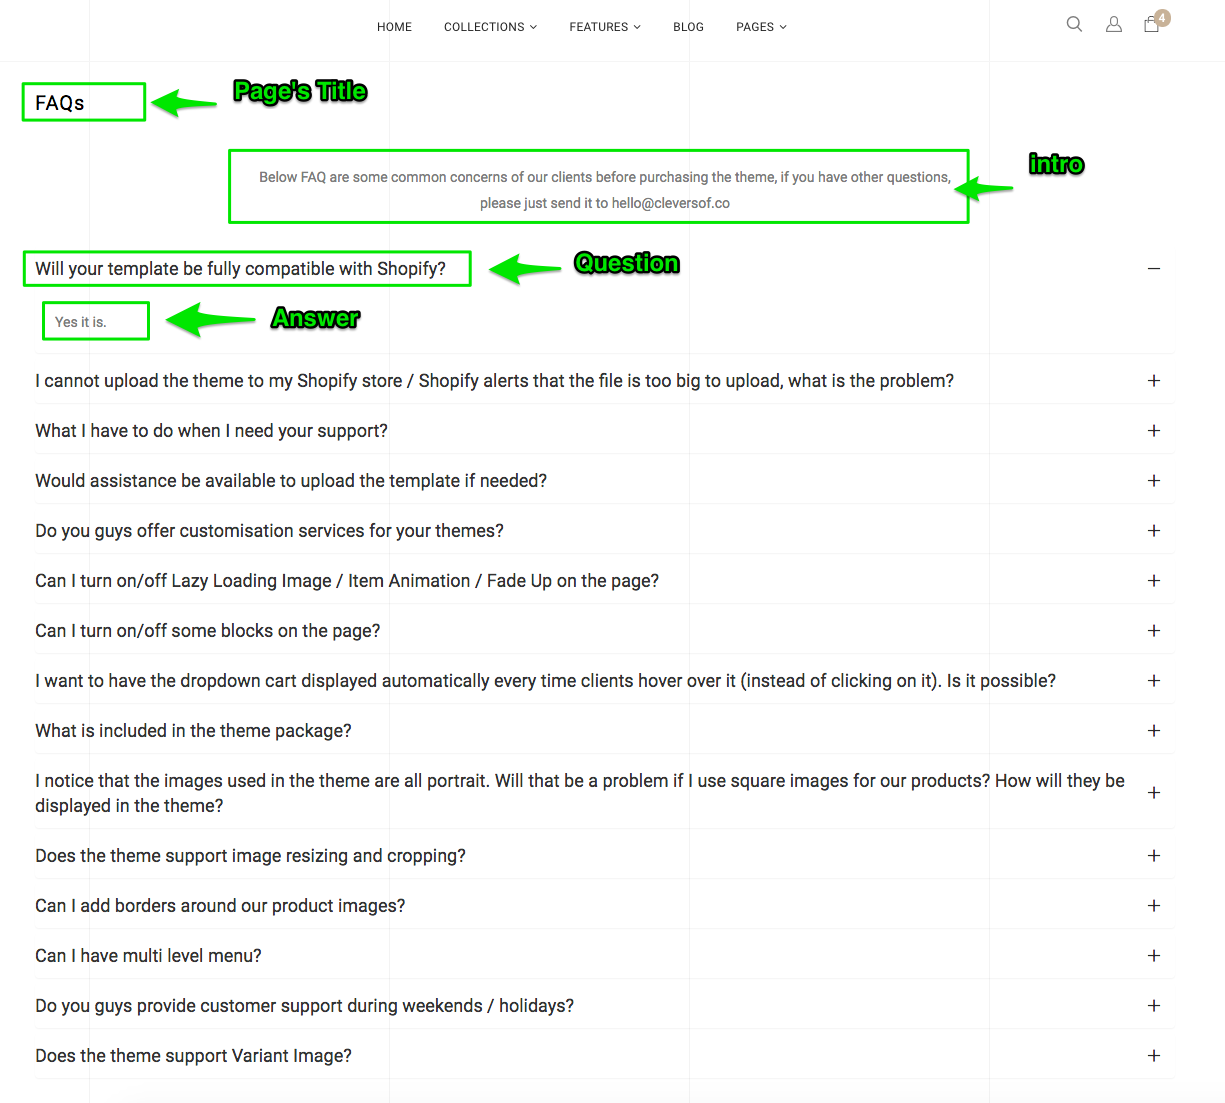
In order to create a FAQs page, please go to Online Store > Pages > Add page:
- Go to Online Store > Themes > Customize theme > FAQs and add content for each question and answer.
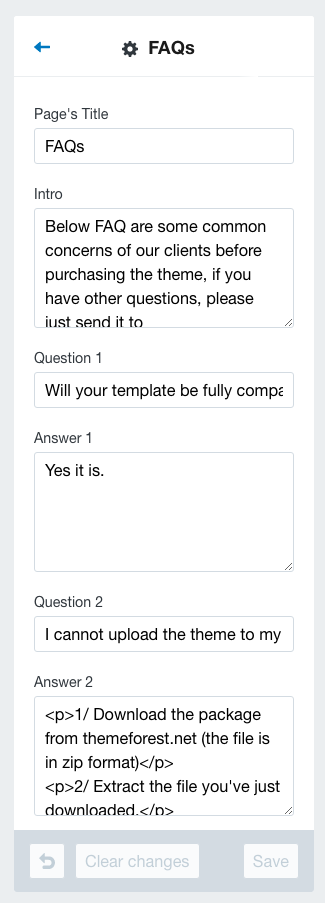
- Save changes
Multiple Languages
How are you going to create a website where can show multiple pages of the same thing, but in different languages? It's easy to use this function in our theme.
Before we begin setting up Multiple Language, you need to read these below parts.
- How to see the available languages for your theme.
- How to change the active language on your storefront.
- How to create a new translation of your Shopify theme.
- How to use the Shopify Language Editor.
How to use Multiple Languages
Login to your Shopify admin panel and go to Online Store --> Themes --> Customize theme
At Multi Languages section, check Enable, then fill in the name of 2 languages and upload the icon you'd like to show at Language 1 and Language 2.
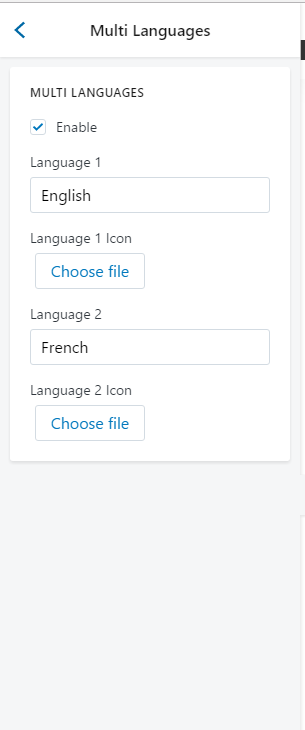
After that, set the active language from the Languages page (in which the active languages matching Lang 1)
Multiple Languages in Navigation & Theme Setting
Login to your Shopify admin panel and go to Navigation
Click link lists you'd like to show multiple languages.
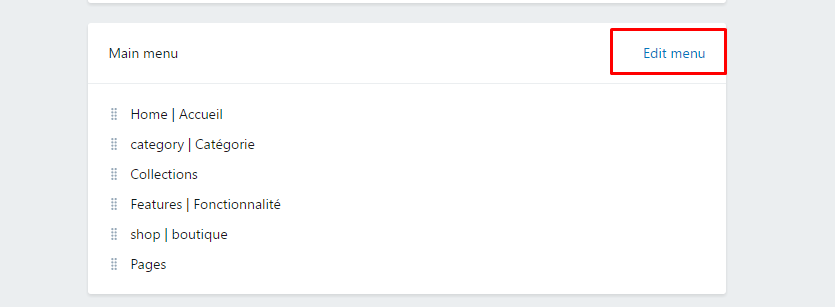
After that, change text follow the structure Lang 1 | Lang 2
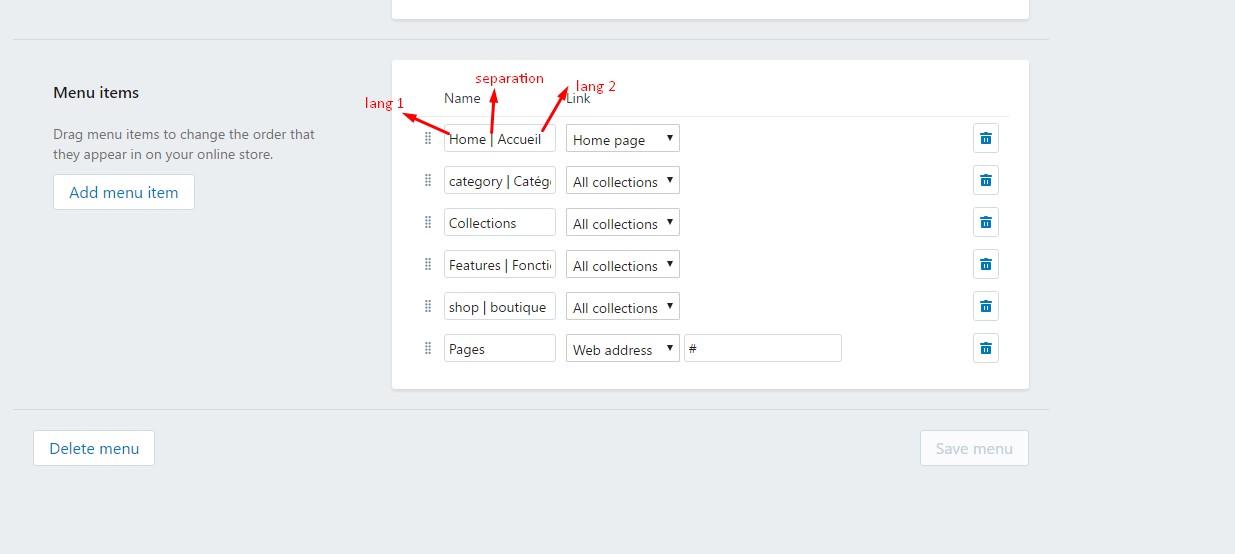
Then click Save to save a link list.
Do the same for Theme Setting.
Multiple Languages in Product Title
Login to your Shopify admin panel and go to Products --> Product List.
Click on the product that you'd like to show multi languages.
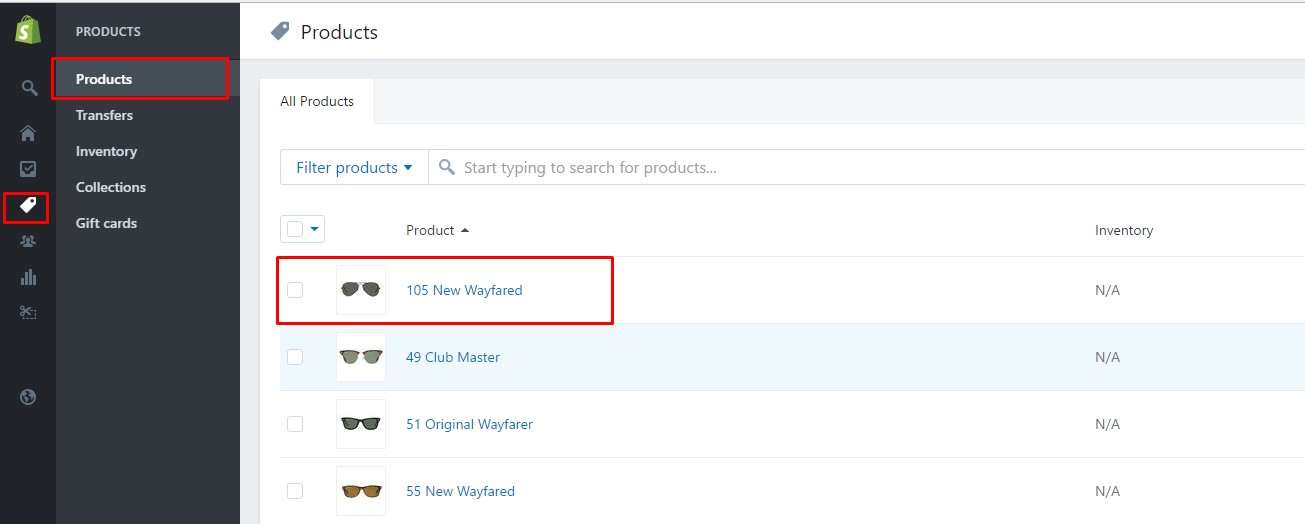
After that, change Product title follow the structure Title Lang 1 | Title Lang 2 .
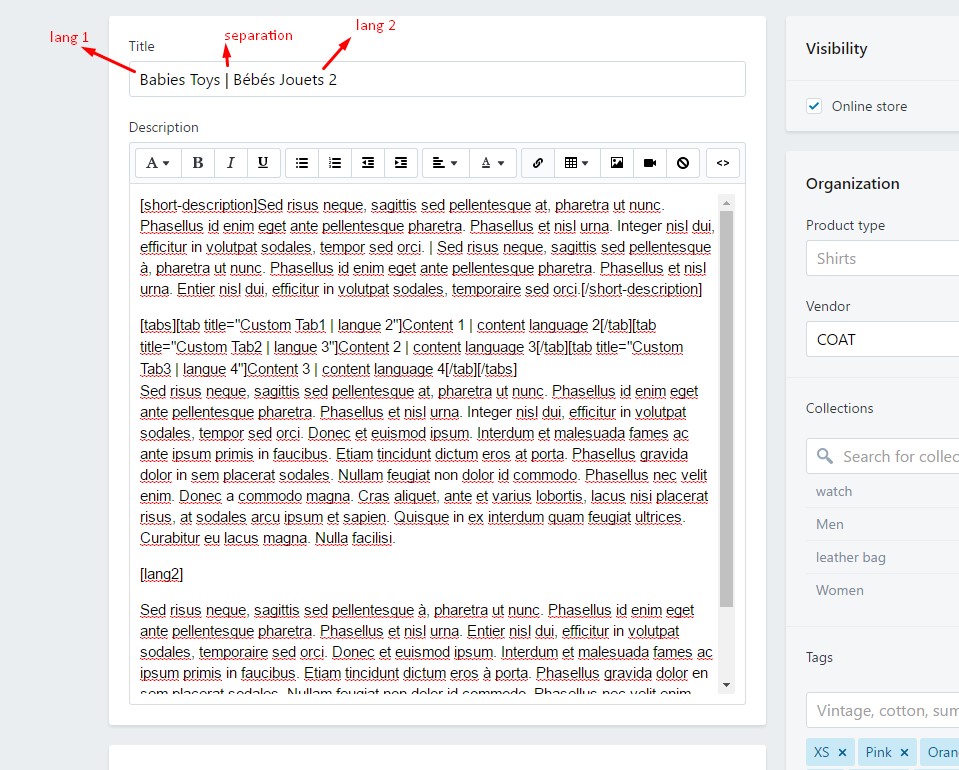
Then click Save to save product.
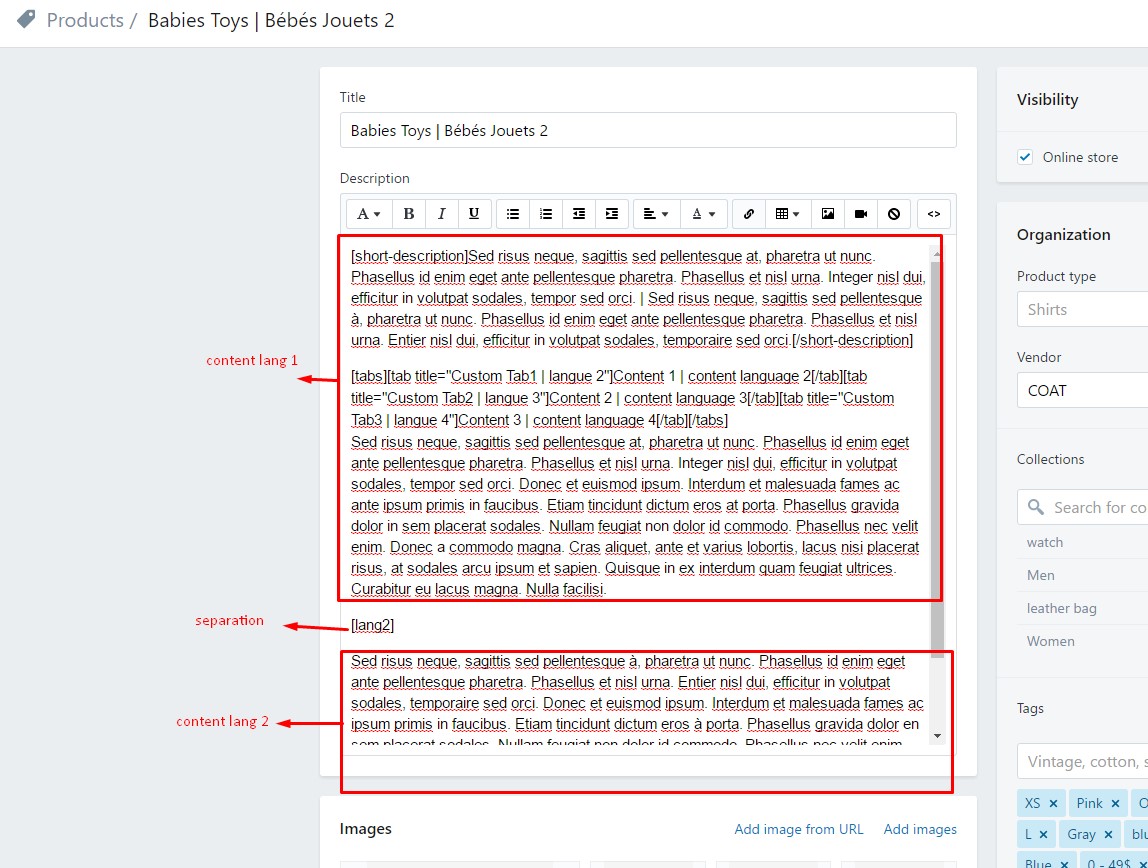
Multiple Languages in Product Description
The Product Description of product need to put follow the structure Content Lang 1 [lang2] Content Lang 2 .
Multiple Languages in Page content
The Page content of product need to put follow the structure Page content Lang 1 [lang2] Page content Lang 2 .
How to translate
Login to your Shopify admin panel and go to Online Store --> Themes --> Edit language

- If your languages which you'd like to show are created before, you need to complete the translation of them. (You can read here to view or update a translation).
- If your languages which you'd like to show didn't create before, you need to create the new translation. (You can read here to know how to create the new translation).
After completing the translation, you need to:
- Go to Themes --> Edit HTML/CSS.
- At Locales folder, it contains files of translation. Please open the file of cleversoft-lang2 (for example: open en.default.json file), copy the content of this file.
- After that search & open cleversoft-lang2.js file, paste the content of en.default.json file into this file from the second line.


Blog
Adding a blog post
Now go to Online Store -> Blog Posts and choose Add a blog post
Show editor and enter the content in form of:
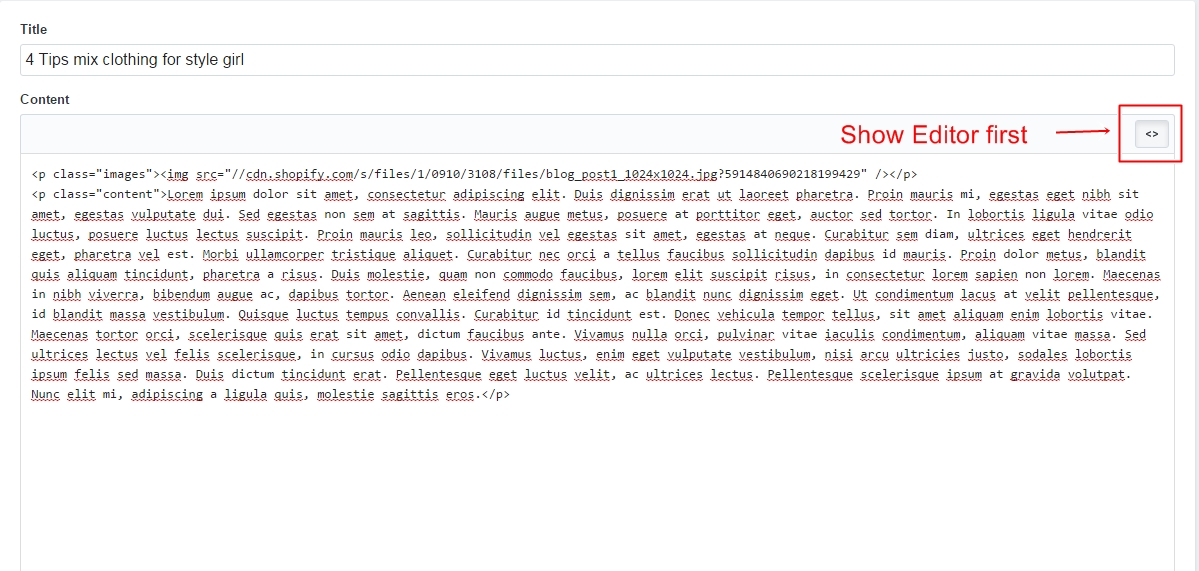
<p class="images"-><img src="[LINK IMAGE]" /-></p->
<p class="content"->[CONTENT]</p->
Here is an example:
<p class="images"-><img src="//cdn.shopify.com/s/files/1/0910/3108/files/blog_post1_1024x1024.jpg?5914840690218199429" /-></p->
<p class="content"->Lorem ipsum dolor sit amet, consectetur adipiscing elit. Duis dignissim erat ut laoreet pharetra. Proin mauris mi, egestas eget nibh sit amet, egestas vulputate dui. Sed egestas non sem at sagittis. Mauris augue metus, posuere at porttitor eget, auctor sed tortor. In lobortis ligula vitae odio luctus, posuere luctus lectus suscipit. Proin mauris leo, sollicitudin vel egestas sit amet, egestas at neque. Curabitur sem diam, ultrices eget hendrerit eget, pharetra vel est. Morbi ullamcorper tristique aliquet. Curabitur nec orci a tellus faucibus sollicitudin dapibus id mauris. Proin dolor metus, blandit quis aliquam tincidunt, pharetra a risus. Duis molestie, quam non commodo faucibus, lorem elit suscipit risus, in consectetur lorem sapien non lorem. Maecenas in nibh viverra, bibendum augue ac, dapibus tortor. Aenean eleifend dignissim sem, ac blandit nunc dignissim eget. Ut condimentum lacus at velit pellentesque, id blandit massa vestibulum. Quisque luctus tempus convallis. Curabitur id tincidunt est. Donec vehicula tempor tellus, sit amet aliquam enim lobortis vitae. Maecenas tortor orci, scelerisque quis erat sit amet, dictum faucibus ante. Vivamus nulla orci, pulvinar vitae iaculis condimentum, aliquam vitae massa. Sed ultrices lectus vel felis scelerisque, in cursus odio dapibus. Vivamus luctus, enim eget vulputate vestibulum, nisi arcu ultricies justo, sodales lobortis ipsum felis sed massa. Duis dictum tincidunt erat. Pellentesque eget luctus velit, ac ultrices lectus. Pellentesque scelerisque ipsum at gravida volutpat. Nunc elit mi, adipiscing a ligula quis, molestie sagittis eros.</p->
Setting up layout for Blog Post
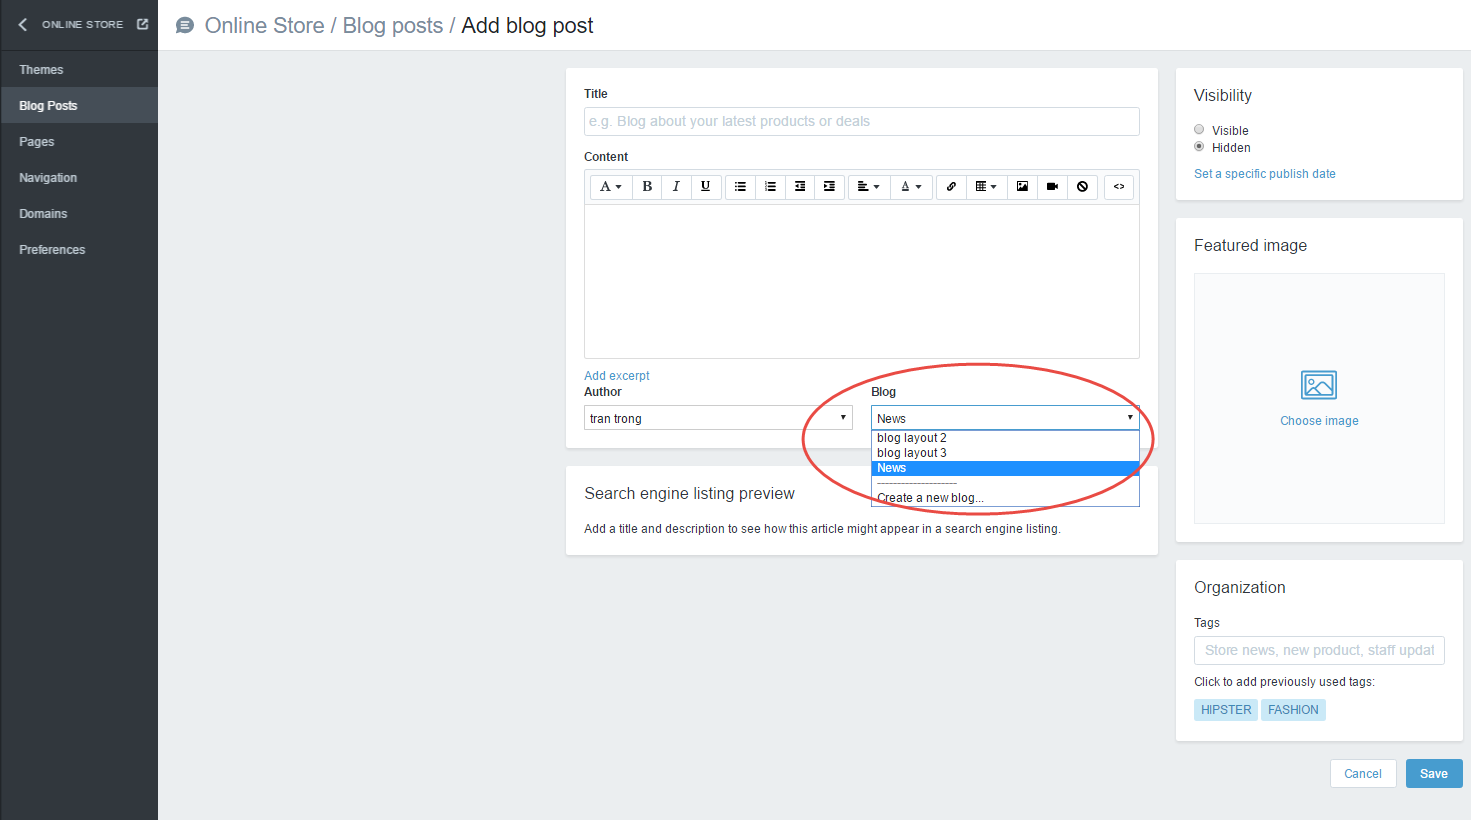
You'll use the blog template options to choose the template layouts for blog articles and listing pages. Follow the instructions below to set up how your blog should appear.
When creat a blog post click Blog to be applied to the blog template settings.
Go to Online Store > Navigation > Blog > Set the link of blogs that you would like to display on each page of your listing views
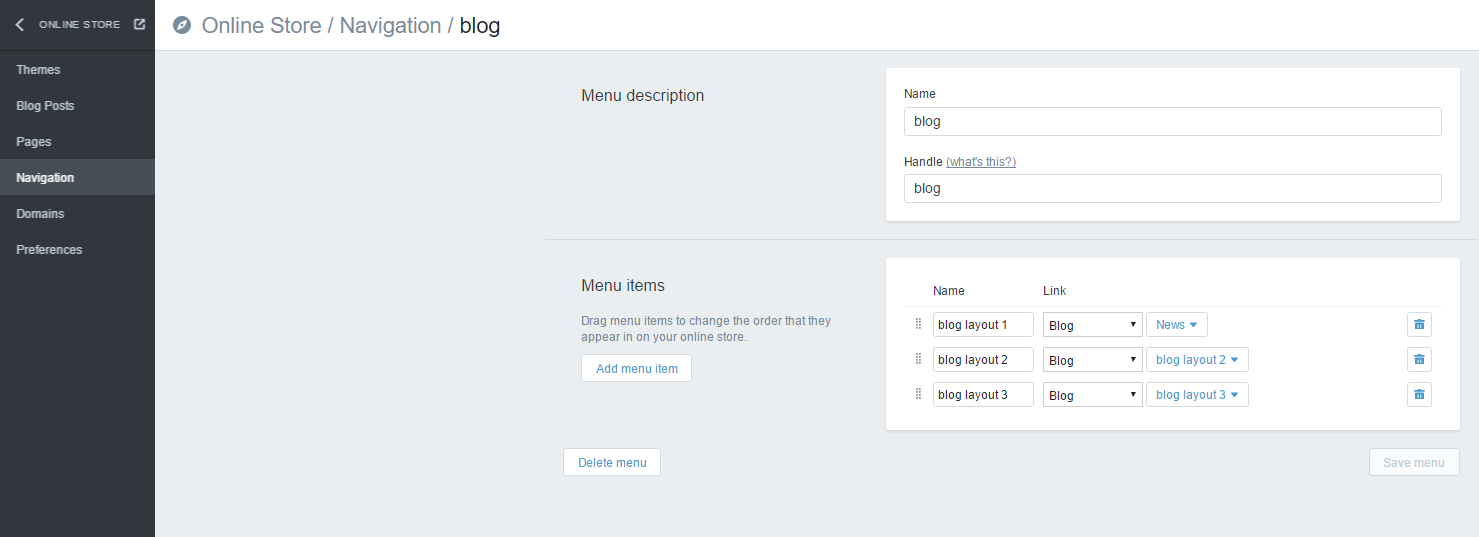
Here is the result :

Google Fonts
Organic allows you to add one custom google font, that can be used for titles, menus and other texts in theme. To do that you must paste the include URL for your desired font in the text box for Fonts Name (Themes-> Customize theme -> Fonts). Here's an example:
Go to http://www.google.com/fonts and pick a font you like or choose normal fonts.
Enter the name of font in the box:
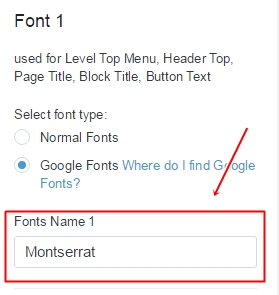
- Save changes.
Troubleshooting
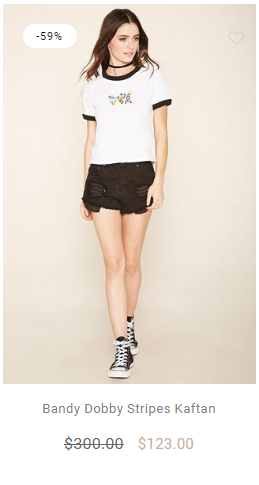
Adding "SALE" label
To add icon with text "Sale" to a product, you just have to specify a compare price in the management page for the specific product. Please follow these steps:
Choose the Products tab then click on an item you want to add "SALE" icon to
Set the price in the Compare at price are. You must set the price in Compare at price is bigger than in Price area

Then here is the result:
Change Logs
------------ 1.0.0 Release Feb 10, 2017  ------------

! Initial Release
Support Us
We want to know if you are happy, unhappy, or disappointed with something the feature has done, or if you have a suggestion about how we can do something better.
Once again, thank you so much for purchasing this theme. As we said at the beginning, we'd be glad to help you if you have any questions relating to this theme. No guarantees, but we'll do my best to assist. If you have a more general question relating to the themes on ThemeForest, you might consider visiting the forums and asking your question in the "Item Discussion" section.
All feedback will be taken seriously and treated confidentially.